The Principles of Battle
In this chapter17
The following section consists of the core concepts and essentials of First Blood. From what is needed to play a game, to what consists of a Warband, and what the Characteristics of your Warrior's profiles mean. A firm understanding of these principles will lead to mastery on the battlefield.
A Civilised War
Although you and your opponent both seek to win the Battle, it should never be at the expense of the experience. Should a situation arise that an interaction cannot be clearly defined in the Rules, discuss with your opponent the most appropriate solution to resume play. If a consensus cannot be reached, simply randomly determine how it should be resolved.
Dice
Comparative Rolling
All Hits and Blocks in First Blood are Comparative, meaning that the specific result (1-6) on each individual Die is important! Leave all Rolled Hits on the table until all Blocks have been Resolved.
Success and Failures
Characteristic Tests in First Blood are either Successes or Failures. If the result is equal to or under the Characteristic being tested then it is a Success, otherwise it is a Failure.
Roll Sequence
Primary Roll
The initial Dice Rolled when resolving any Attack, Hit, Block, or Characteristic Test are referred to as the Primary Roll.
If any Special Rules or effects trigger from the results of the Primary Roll such as Re-Rolls or Additional Hits; all effects are applied simultaneously.
Certain Rules will state to Re-Roll a die (either single, multiple, or a specific result). No matter how many sources of Re-Rolls, a single Die can never be Re-Rolled more than once.
Secondary Roll
Any additional Dice or Re-Rolls are all Rolled together in the Secondary Roll. These results are final, no Re-Rolls or additional Dice can be triggered by the results of a Secondary Roll.
Epic Fail
An unmodified Roll of a '6' is always considered a Failure.
Re-rolling Failures vs Successes
When Rolling a Characteristic Test, if a Roll is affected by both Re-Rolling all Failures and Re-Rolling all Successes, they cancel out. Both Rules are ignored for the Roll.
Bases
The 'Base' of a Warrior refers to the circular component that the model is attached to; representing their footprint on the Battlefield. It is expected that models are attached to the base that is provided with. Certain Warriors may be attached to multiple bases, in which case all parts of the base are considered as one singular base for all rule purposes.
Measuring Distance
Distances on the Battlefield are measured in Inches and are always measured horizontally from a Model's Base. Players may freely measure any distances on the Battlefield at any time. Rules that affect Warriors within a distance will do so while any part of the Warrior's base is within the effect's Range.
As Distances are measured horizontally, Size and Elevation never affect Distances for Command Abilities, Special Rules, Spells, etc.
Rounding
If a Special Rule or effect halves a Characteristic or Distance, it is always rounded up to the nearest whole number.
Example: A March 5 Warrior performs a Reposition Action (moving half their March), the Warrior may move up to 3".
Warbands, Regiments, and Warriors
Your collection of models in any given battle are referred to as your 'Warband'. All models in your Warband are referred to as 'Warriors'. Warriors in your Warband vary greatly relative to their power and impact on the Battlefield from mighty Heroes, savage Monsters, to humble Infantry.
Warriors from your Warband are referred to as "Friendly Warriors" and Warriors not from your Warband are referred to as "Enemy Warriors" or simply as "Enemies". When playing games with teammates, your teammate's Warriors are considered "Allied" Warriors.
Command Cards
All Warlords, Heroes, Monsters, and Regiments in your Warband have a corresponding Command Card that includes their profile Name and Art. These cards are used to Deploy and Activate the corresponding Warlord, Hero, Regiment, or Monster throughout the battle.
You may never include multiple of the same Command Card. Every Command Card has a QR code which can be scanned through the Conquest Companion App to quickly access their Rules!
Command Cards are used to track what Warriors already Activated during a round, and what Warriors have yet to be Activated. At the start of every Round, all of your Command Cards should be arranged next to each other face-up and visible to both you and your opponent.
When it is your turn to Activate a Command Card, select a Command Card and flip it over so it is face-down. This indicates that this Command Card has already been Activated and cannot be selected again to be Activated for the rest of the Round.
Command Abilities, Effects, and Duration
Command Abilities and Special Rules that affect friendly Warriors also affect the Warrior themselves unless otherwise stated.
Warriors benefit from the Command Ability or Special Rule if they begin an Action within the Command Range (CR) of the Character, regardless of Line of Sight.
All Command Abilities and Special Rules granted during a Round expire at the end of the round unless otherwise indicated.
Duplicates of the same Command Ability or Special Rule are not cumulative and provide no additional effect beyond the first.
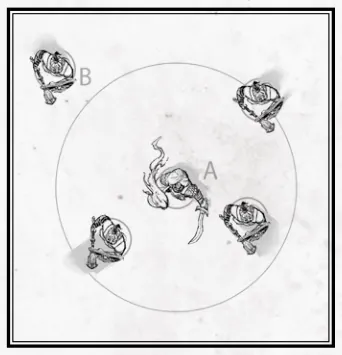
Warrior B is currently outside of Character's A Command Range and therefore will not benefit from any Command Ability.
Timing and Simultaneous Effects
The Player currently performing Command Abilities during the Command Phase or Activating a Command Card during the Action Phase is the Active Player.
If multiple effects, Special Rules, or Draw Events trigger at the same time, the Active Player chooses in which order they are resolved.
Battlefield Roles
All Warriors have one or more Battlefield Roles listed in their profile. Many Special Rules, Abilities, and effects will specify what type of Warriors they can affect.
Most Battlefield Roles have no innate effect and are used simply to define different interactions on the Battlefield. Battlefield Roles will often be referred to simply as "Roles".
Below is a list of common Battlefield Roles.
• Infantry • Cavalry • Brute • Monster
• Character • Spellcaster Unique Battlefield Roles
All Factions utilize their own unique Battlefield Roles within their Profiles.
These range from physical traits and military structures to societal castes and spiritual ideologies.
These Battlefield Roles are introduced within each Faction's Army List.
Engagement Range
All Warriors possess a 1" area around their base that is referred to as their Engagement Range. Warriors within 1" of an Enemy and within Line of Sight are considered Engaged. While Engaged with an Enemy, Warriors may only perform Combat Actions.
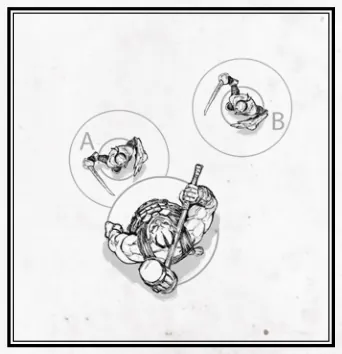
Warrior A is Engaged and may only perform Combat Actions, while Warrior B is Unenganged and may only perform Out of Combat Actions.
Line of Sight (LoS)
Line of Sight (LoS) is used to determine if Warriors are visible to each other on the Battlefield and can be Targeted. LoS must be drawn any time an Action, Special Rule, Spell, or Effect requires a Target.
To determine a Warrior's LoS, draw a line the width of the Warrior's Base to the width of the Target's Base. If any part of this Line travels uninterrupted between the two Warriors, then the Warrior has LoS to the Target.
When drawing LoS, all Warriors and Terrain that are of a smaller Size than the Target are ignored.
Size Matters
Warriors of impressive stature are able to see over obstacles that would otherwise impede those lesser than themselves.
Intervening Warriors and Obscuring Terrain are ignored if they are both a smaller Size than this Warrior and are closer to this Warrior than to the Target. (See example below)
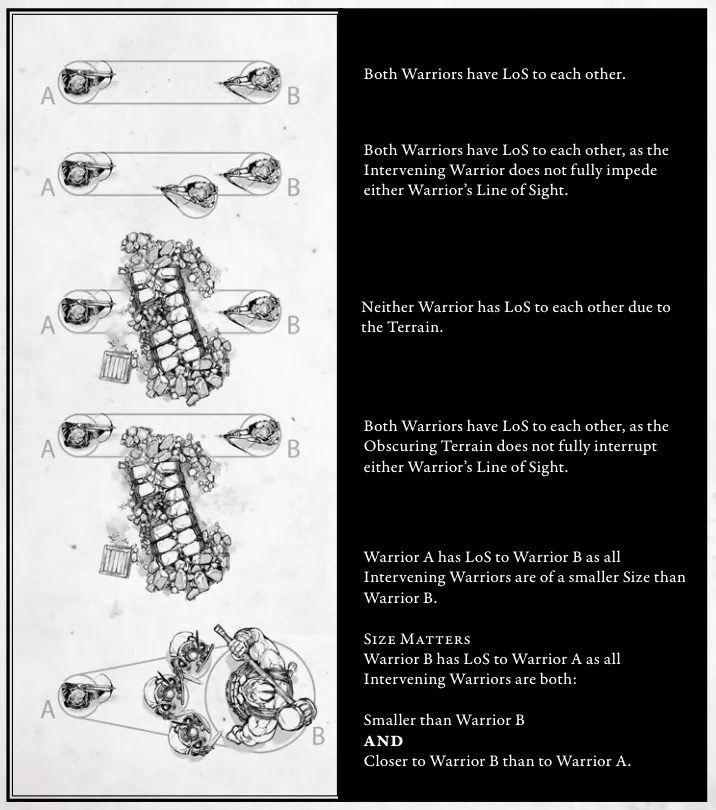
Both Warriors have LoS to each other.
Both Warriors have LoS to each other, as the Intervening Warrior does not fully impede either Warrior's Line of Sight.
Neither Warrior has LoS to each other due to the Terrain.
Both Warriors have LoS to each other, as the Obscuring Terrain does not fully interrupt either Warrior's Line of Sight.
Warrior A has LoS to Warrior B as all Intervening Warriors are of a smaller Size than Warrior B.
Size Matters — Warrior B has LoS to Warrior A as all Intervening Warriors are both smaller than Warrior B AND closer to Warrior B than to Warrior A.
The Warrior Profile
Each Warrior has a Characteristics Profile as a measure of its ability on the battlefield. The Characteristics Profile is broken down among different Characteristics, as well as a number of Special Rules and Draw Events.
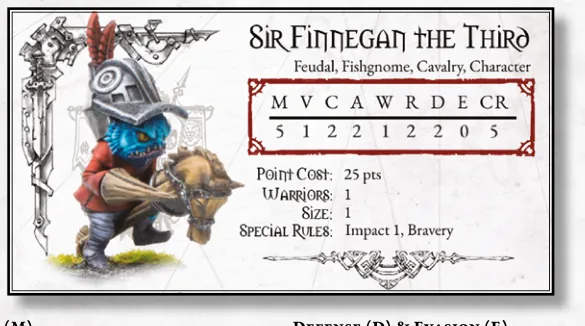
March (M)
The speed at which this Warrior can traverse the Battlefield. The Distance this Warrior can Move during Movement Actions.
Volley (V)
The Warrior's Skill with ranged weapons. The total number of Hits this Warrior can inflict onto a single Enemy during Volley Actions.
Clash (C)
The Warrior's Skill in Close Combat. The total number of Hits this Warrior can inflict onto a single Enemy during Clash Actions.
Attacks (A)
The ferocity of this Warrior in Close Combat. The number of Dice this Warrior Rolls during Clash Actions.
Wounds (W)
The innate durability of this Warrior. The number of Wounds this Warrior can suffer before being Slain.
Resolve (R)
This Warrior's strength of will and presence of mind. The value this Warrior needs to Roll equal to or below for Resolve Tests.
Defense (D) & Evasion (E)
This Warrior's defensive combat skill and quality of protective equipment and their skill at evading enemy attacks through agility or magical protection. The number of Dice this Warrior may Roll when Blocking Hits. When Blocking, a Warrior will use either their Defense or Evasion Characteristic; whichever is higher after modifiers.
Command Range (CR)
This Warrior's leadership skills and imposing presence on the battlefield. The Range that this Warrior's Command Abilities affect and other leadership based effects.
Size
This Warrior's stature, from minute creatures to towering monsters. The Warrior's physical size on the Battlefield.
Battlefield Roles
This Warrior's faction affiliations and defining traits. Keywords used to indicate how certain Rules and effects interact with this Warrior.
Characteristics Tests
Any Rule that calls for a Warrior to Roll a Die and compare it to a Characteristic of theirs is referred to as a Characteristic Test. Roll a Die and compare it to the Characteristic being tested on the Warrior.
A Characteristic Test is a Success if the result is equal to or less than the current modified Characteristic of the Warrior, otherwise it is a Failure. Rolls of '6' are always a Failure regardless of the Warrior's Characteristic.
Characteristics and Modifiers
Through Special Rules, Effects, Spells or any other manner of circumstances during a Battle; Characteristics can be modified to 0, causing any Test to be automatically Failed!
Movement VS Placing
Movement
There are many Actions, Special Rules, and effects that allow Warriors to press on and take the fight to (or away!) from the Enemy. All Movement follow the same restrictions and guidelines. Measure the distance from the Model's base and move in a straight line.
When Moving a Warrior, it may travel in any direction and may split its total distance amongst multiple directions. A Warrior cannot move through any other Warriors (Friendly or Enemy!) and at the end of the Movement no part of their base may travel further than the Move distance.
Warriors may enter and move freely within Enemy Engagement Ranges, but may only leave if allowed to do so.
Placing
When a Special Rule or effect calls for a Warrior to be "Placed" simply take the model and place it anywhere within the indicated Distance, ignoring all Warriors and Terrain in between.
Effects that trigger on "Moving" do not occur when a Warrior is Placed. Sometimes a Rule will call for a Warrior to be Placed wholly within a distance, meaning that no part of the Warrior's Base may be Placed further than the indicated distance.
A Warrior may be freely Placed into or Out of Enemy Engagement Ranges. A Placed Warrior may even be Placed onto or off of a Vantage Point regardless of its Elevation. Granted there is room for them to fit!
Warrior Statuses
Over the course of a battle, Warriors can be inspired to perform great feats of glory or broken to the brink of death. A moment of weakness or greatness can turn the tide of battle.
A Warrior cannot be affected by multiple instances of the same Status. When a Warrior becomes affected by the following Statuses, mark them appropriately.
Inspired!
Driven to greater acts of heroism or savagery, this Warrior is instilled with renewed vigor!
This Warrior gains +1 to their Attack Characteristic.
Aimed!
With a steady hand and steely gaze, this warrior concentrates on delivering a fatal shot.
This Warrior gains +1 to their Barrage Special Rule.
A Warrior must have the Barrage X Special Rule to become Aimed!
Broken!
Be it by injury, exhaustion, or terror, this Warrior has lost impetus and must regain their courage!
This Warrior suffers the following effects until they Rally or are Slain:
- Automatically fails all Resolve Tests. Which means they will be Slain if they suffer enough wounds!
- May only perform the Rally or Combat Rally Actions.
- Is ignored when determining Outnumbered Warriors during Clash Actions. (both Friendly and Enemy!)
- Cannot perform Command Abilities and any Command Abilities currently Active immediately expire.
- Cannot perform Spells.
Driven Back
When a Warrior is Driven Back either by becoming Broken! from an Enemy within their Engagement Range or from a Special Rule; The Broken! Warrior is Moved directly away from the Enemy that caused them to be Driven Back until there are 2" between them or they contact another Warrior or Impassable Terrain.
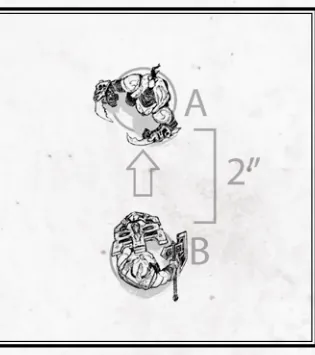
Warrior A is Driven Back from Warrior B and is Moved directly away until there are 2" between them.
Rally!
Through rousing oration from a superior or through true grit and determination, this Warrior takes to the Battle with renewed vigor.
Many Special Rules and effects in First Blood will cause Broken! Warriors to Rally. When a Broken! Warrior Rallies, immediately remove their Broken! Marker.
Last updated