Dynamic Scenarios
In this chapter14
Battles are fought for various reasons, be it noble or ignoble a cause. Vying for territory, resources, or revenge; the causes for war prove innumerable. There is always a reason for armies to muster and for blood to be spilt.
Ranging from clandestine raids to heroic last stands; this document allows you and your opponent to generate a Scenario collaboratively as well as competitively. Clever decisions allow you to influence the circumstances of the Battle, granting your Warband the advantage and force the Enemy to fight on your terms. No two battles will be the same!
The following Elements make up a Scenario:
Mission
The primary goal of the Battle. Details what Objectives are being used, where they are located on the Battlefield, and how to score Victory Points; which are either earned during the Victory Phase every Round, or scored at the End of the Battle.
Territory
How the Warbands meet and where they can be Deployed.
Encounters
Extraneous circumstances, luck, or misfortune that influence the course of the battle. Some may serve as a secondary Objective and even grant Victory Points!
Tactic
A Strategy or Ploy available to your Warband. Each Mission, Territory, and Encounter has an accompanying Tactic; creating a Pool of 3 that Players must uniquely select from. The same Tactic cannot be chosen by both Players!
Battlefield & Terrain
Battlefield Size
Games of First Blood are designed to be played on a 4'x4' table with the grid squares on each Mission and Territory Map representing a 12"x12" area. This Scenario Packet can be used to facilitate games of varying square board sizes, simply scale the Map appropriately by dividing the Square by 4. Below are a few examples;
- 4'x4' - 12" grid
- 3'x3' - 9" grid
- 2'x2' - 6" grid
Terrain
Before Generating your Scenario, you must first set the Battlefield up with Terrain that is both amicable and aesthetically pleasing, leaving at least 4" between any Impassable Terrain Features. If playing in an Event, this will be set up by your Tournament Organizer.
Generating a Dynamic Scenario
Determine First Player
Players Roll-off to determine who will be the First Player during Deployment. Each Player Rolls a Die, whoever has the lowest result is the First Player. If drawn, Players Re-Roll until a winner is decided.
First Player Drafts an Element
The First Player Rolls a Die, then must choose a single Element of the corresponding result on any Chart. Rolling a 3, the First Player then chooses either Mission, Territory, or Encounter [3].
Second Player Drafts an Element
The Second Player Rolls a Die, then must choose a single Element of the corresponding result on either of the remaining Charts. If the First Player selects a Mission, the Second Player must choose either a Territory or Encounter!
Randomize Final Element
Finally, Either Player Rolls a Die; the result randomly drafts the Final Element of the Scenario. If both the Objective and Territory were drafted, the Encounter is random! Even the greatest general can't predict everything…
Choose Tactics
Of the Tactics available from the 3 drafted Elements in the Scenario, Players select a Tactic starting with the First Player. Tactics only apply to and benefit the selecting Player. Both Player's chosen Tactics take effect throughout the entirety of the Battle. Reminder, the same Tactic cannot be chosen by both Players!
Deploy Warbands
Players alternate Placing Command Cards starting with the First Player, then alternate Revealing Command Cards. Once all Warrior have been Placed, Now the Battle can begin!
Generating a Dynamic Scenario
By the end of the generative process, both Players have determined:
- The Mission: What the Battle is being fought over.
- The Territory: Where Players deploy their Command Cards.
- The Encounter: What modifier affects the battle.
- And finally, each Player has selected their own Tactic, chosen from those available from determining the prior Scenario Elements.
Now the Battle can begin! Roll Supremacy for the first turn!
Scenario Objectives
Friendly, Neutral, & Enemy Objectives
A Warlord must become acquainted with the different Objectives that you may come across on the Battlefield. When generating a Scenario, if an Objective is at least partially within only a single Player's Deployment Zone, it is Friendly to them and Enemy to the other Player. Otherwise it is Neutral.
Artefacts
Artefacts represent any number of possible items that the two forces are striving to claim such as ancient treasures, powerful relics, or even a fallen comrade of great importance.
Artefacts are represented by a marker on the Battlefield about 1" in diameter (an Infantry Base works well). An Artefact is ignored for Movement and determining Line of Sight. Whenever a Warrior is Placed upon or ends a Movement in contact with an Artefact, it is immediately Seized; remove the Artefact from the battlefield and mark the Warrior that is Seizing the Artefact.
The Warrior Seizes the Artefact until they are Slain or Removed from the Battlefield. When a Warrior is Slain or removed from the Battlefield, Place the Artefact centered directly under its base. If the Warrior was on a Vantage Point, Place the Artefact onto the Battlefield as close as possible to where the Seizing Warrior was Slain/Removed. The Artefact will remain there until another Warrior can Seize it for themselves. A Warrior can only Seize a single Artefact at a time.
A Warrior may even Seize an Artefact when Placed during deployment!
Friendly/Enemy Artefacts: Artefacts are always Neutral regardless of their location.
Scenario Objectives
Battlefield Targets
A Battlefield Target can be a piece of siege equipment to dismantle, a monument to defile, or a granary to burn.
A Battlefield Target is an Impassable but Destructible terrain feature with a Size of 3 and is represented on a single Brute Base. Battlefield Targets can be Charged, Attacked, Targeted, and Destroyed and are treated as if they were an Enemy Warrior. Battlefield Targets have a Defense of 3, a Wounds characteristic of 6, and gain +1 Defense against Hits caused from Warriors outside of Engagement Range. Battlefield Targets never Test Resolve and can never be Moved or Placed.
Battlefield Targets can never be Outnumbered!
Warriors within Engagement Range with only a Battlefield Target may perform both Combat or Out of Combat Actions. A Warrior can freely March away from a Battlefield Target!
Friendly Battlefield Targets: Cannot be Targeted by Friendly Warriors. Instead Rewards their Victory points to the Friendly Player at the End of the Battle if it is not Destroyed.
Critical Sites
Critical Sites are areas of the battlefield that are decisive to claiming victory. Be it a pivotal battlefield objective such as a garrison to fortify or a place of other importance such as a sacred ground. Both forces seek to either claim these areas for themselves or to simply deny their enemies opportunity.
Critical Sites are represented with either (6") or (9") circular zones. Critical Sites are ignored for Movement and Line of Sight. All Warriors at least partially within the Critical Site contribute to Seizing the Site. Broken Warriors and Warriors upon a Vantage Point never contribute to Seizing a Site. If both Players have Warriors within the Critical Site, both Players tally the total number of remaining Wounds amongst their contributing Warriors. Monsters contribute remaining Wounds across both Profiles. Whichever player has a higher total Seizes the Critical Site, otherwise it is Contested.
Friendly Critical Sites: Grant 1 VP fewer each Victory Phase.
Enemy Critical Sites: Grant 1 VP more each Victory Phase.
Victory Conditions
Victory Points
Scenario Elements dictate how a Battle is to be fought and how it is won. Elements will grant Players Victory Points (VP) for achieving different tasks on the Battlefield. Victory Points are typically granted during each Victory Phase or at the End of the Battle.
Game Length
First Blood Battles last for 6 Rounds. If a Player meets the misfortune of having no Warriors left on the Battlefield, the surviving Enemies continue the Battle, scoring any Objectives they can before the Battle Ends. Whichever Player has more VP at the end of the Battle is Victorious. Even if their entire Warband is Slain!
Setting up the Battlefield
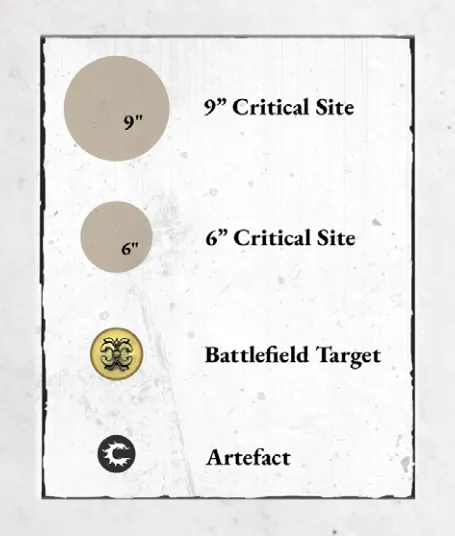
Territory and Mission Maps are always set up from the perspective of the First Player. Territory and Missions are oriented where the bottom table edge faces the First Player. The First Player may still choose either Territory to Deploy within.
Critical Sites are always Placed onto the Battlefield, beneath any Terrain Features. If an Artefact or Battlefield Target cannot be Placed due to Impassable Terrain, simply nudge any conflicting Terrain the shortest distance needed to allow the Objective to be Placed (maintaining 4" between Impassable Terrain features including Battlefield Targets).
Missions 1 - 2
[1] Seize Ground
![Mission map [1] Seize Ground](fig/fbds-mission-1.webp)
Characters automatically seize Critical Sites, regardless of the number of Enemies occupying it. If both players have Characters within the Site, then it is contested.
Victory Phase
- Gain 1 VP for each 6" Critical Site Seized.
- Gain 2 VP if the 9" Critical Site is Seized.
End of Battle
- Gain 2 VP for each Friendly Warlord within the central Critical Site.
Tactic — Test of Honor: Enemy Characters within Critical Sites cannot decline Duels.
[2] Ransack
![Mission map [2] Ransack](fig/fbds-mission-2.webp)
When the Battlefield Target is Destroyed, Place a single Artefact centered underneath it.
Victory Phase
- Gain 2 VP if you Destroyed the Battlefield Target this Round.
- Gain 1 VP if you are Seizing more Artefacts than your opponent.
End of Battle
- Gain 2 VP for each Artefact Seized.
Tactic — Pilfer: Friendly Warriors seizing Artefacts may Move their full March Characteristic when performing Reposition Actions.
Missions 3 - 4
[3] Desecration
![Mission map [3] Desecration](fig/fbds-mission-3.webp)
At the start of the Victory Phase, all Warriors Engaged with a Battlefield Target suffers 1 Hit. Roll each Hit separately.
Victory Phase
- Gain 2 VP for each Battlefield Target you Destroyed this Round.
End of Battle
- Gain 3 VP for each Enemy Warlord Slain.
Tactic — Warded: Friendly Warriors do not suffer Hits from Battlefield Targets.
[4] Ritual
![Mission map [4] Ritual](fig/fbds-mission-4.webp)
Victory Phase
- Gain 2 VP if you Seize the Critical Site.
- Gain 2 VP for each Friendly Warrior within the Critical Site currently Seizing an Artefact; then remove the Artefact from the Battlefield.
End of Battle
- Gain 1 VP for each Artefact Seized.
Tactic — Empower: Friendly Spellcasters within the Critical Site or Seizing an Artefact gain +1 to their Spellcaster Special Rule.
Missions 5 - 6
[5] Proving Grounds
![Mission map [5] Proving Grounds](fig/fbds-mission-5.webp)
After all Warriors are Deployed, each Player selects a single Friendly Warrior on the Battlefield to begin the Battle Seizing an Artefact; starting with the First Player. While Seizing an Artefact, Warriors gain +1 Attack.
Victory Phase
- Gain 3 VP for each Enemy Warlord or Monster Slain this Round.
- Gain 2 VP for each Enemy Hero Slain this Round.
- Gain 1 VP for each Enemy Leader Slain this Round.
End of Battle
- Gain 2 VP for each Artefact Seized.
Tactic — Implacable: Friendly Warriors Engaged with an Enemy Seizing an Artefact may choose to not be Driven Back.
[6] Raze
![Mission map [6] Raze](fig/fbds-mission-6.webp)
Critical Sites are worth an additional VP if the Battlefield Target atop them is destroyed. *Note that the Battlefield Targets are placed in the center of the 6" Critical Sites.*
Victory Phase
- Gain 2 VP for each Battlefield Target you Destroyed this Round.
- Gain 1 VP for each Critical Site Seized.*
End of Battle
- Gain 2 VP for each Enemy Warlord Slain.
Tactic — Siegecraft: Friendly Warriors may Re-Roll Attack Rolls of '6' against Battlefield Targets. Friendly Battlefield Targets may Re-Roll Block Rolls of '6'.
Territories 1 - 2
[1] Battleline
![Territory map [1] Battleline](fig/fbds-territory-1.webp)
Tactic — Surprise Attack: During the Deployment Phase, Players do not alternate Placing Command Cards. The Enemy Player must Place all their Command First, you then Place all your Command Cards after. Players alternate Revealing their Warriors normally.
[2] Crossroads
![Territory map [2] Crossroads](fig/fbds-territory-2.webp)
Tactic — Fog of War: After Deploying Command Cards before Players Reveal any Warriors, you may pick up a single Friendly Command Card and redeploy it within your Deployment Zone.
Territories 3 - 4
[3] Surrounded!
![Territory map [3] Surrounded!](fig/fbds-territory-3.webp)
Tactic — Seize the Day: During the First Battle Round, you are automatically the Supremacy Player.
[4] Divide and Conquer
![Territory map [4] Divide and Conquer](fig/fbds-territory-4.webp)
Tactic — Incursion: During the Deployment Phase, Friendly Command Cards must be Placed outside of 6" of Enemy Command Cards instead of the usual 9".
Territories 5 - 6
[5] Confrontation
![Territory map [5] Confrontation](fig/fbds-territory-5.webp)
Tactic — Enmity: During the Deployment Phase, both Players must Place their first Command Card within their Deployment Zone, as close to the Center of the Battlefield as possible ignoring Enemy Command Cards. Warriors from these Command Cards may not be Placed within the Enemy Deployment Zone.
[6] Encircle the Foe
![Territory map [6] Encircle the Foe](fig/fbds-territory-6.webp)
Tactic — Forward Deployment: During the Deployment Phase, a single Friendly Command Card may be Placed in Neutral Territory anywhere further than 9" from the Enemy Deployment Zone.
Encounters
[1] First Blood
Each Battle Round, the Player that Slays the first Enemy immediately gains 1 VP.
Tactic — Bloodthirsty: Every Round, the Warriors Activated from the first Friendly Command Card gain +1 March until the end of their Activation.
[2] Vendetta
During your Command Phase, select a single Enemy Command Card on the Battlefield to be Marked this Round.
If the Marked Enemy Command Card was Slain, gain 1 VP; if your Marked Command Card survived and the Marked Enemy Command Card was Slain, gain 2 VP instead.
Tactic — Impetus: This Battle, you may Re-Roll Supremacy Rolls of '6'.
[3] Last Stand
At the End of the Battle, the Player with more surviving Command Cards gains 2 VP. The Player that has Slain more Enemy Command Cards gains 1 VP.
Tactic — Relief Force: Before Placing Command Cards, secretly select a single Command Card to arrive as Reinforcements and are not Placed during the Deployment Phase. During any Command Phase, a Player may choose to bring on their Relief Force. Choose a point along the edge of the Battlefield within Friendly or Neutral Territory and Place all arriving Warriors wholly within 6" of the point.
[4] Conquest of Champions
When a Warrior slays an Enemy in a Duel, immediately gain 1 VP. At the End of the Battle, the Player with more Characters on the Battlefield gains 1 VP.
Tactic — Heroism: While a Warrior is participating in a Duel, other Friendly Warriors within their Command Range are Inspired!
[5] Reconnaissance
At the End of the Battle, if there are no Enemies within Friendly Territory, gain 1 VP. If any Friendly Characters are within Enemy Territory, gain 2 VP.
Tactic — Scouted: During the Deployment Phase, the Enemy must Place their first Command Card face up onto the Battlefield.
[6] Turn the Tide
At the End of every Victory Phase, the player with the least amount of VP gains 1 VP. If players are tied, neither player receives any VP.
Tactic — Desperation: Friendly Characters may perform Command Abilities while Broken! Friendly Command Abilities do not expire when a Character becomes Broken!
Organized Play
When playing with Dynamic Scenarios in an Event, an Event Organizer may instead use the following Rules for generating Scenarios. This option allows for consistent Victory Points and experience across each table during a Round of Play.
1. Determine Scenario Elements: The Event Organizer determines all 3 Elements of the Scenario and sets up all tables appropriately (Territory Map, Mission Map, and Encounter). *Either Roll Randomly or simply choose which Elements will be used!*
2. Roll for Advantage: Players Roll-off, the Player with the lowest result is the winner. In the case of a draw, Re-Roll until a winner is decided!
3. The Player that won the Roll-off then chooses to be either… • The First Player to select a Tactic, OR • The First Player to Deploy a Command Card and select their Territory. The other Player is the First Player during the remaining choice.
4. Choose Tactics: Both Players select a different Tactic from those available in the order determined above.
5. Deploy Warbands: Both Players alternate Placing and Revealing Command Cards in the order determined above.
6. The Battle begins!
Last updated