The Principles of Battle
Chapter 1
On this page9
In this section we will introduce the basic principles that drive the battles of Conquest. It may look like a lot at first, but it will soon become second nature and you will find yourself referring to this section of the rulebook less and less.
A Civilized War
War may be a brutal and bloody business but playing a wargame shouldn't be. It is a gentlemanly (or gentlewomanly) pursuit, best enjoyed in a companionable state with as few arguments as possible.
With that in mind, if you ever encounter a situation in which you feel the rules are unclear, discuss the matter with your opponent and come up with a solution together. If you are unable to agree, weigh up the most suitable solutions and settle the matter on the roll of a die.
Such situations should be extremely infrequent, as Conquest is constantly updated with errata and FAQs published on the website. The important thing is not to allow any rule-related issues to spoil your enjoyment of the game.
Dice
War is an uncertain business. We use dice to represent that uncertainty, be it the chance of landing a lethal blow or the odds of a Regiment standing and fighting even in the face of defeat. All dice rolls in Conquest use six-sided dice, sometimes called D6.
Making Rolls
Most dice rolls in Conquest require the player to compare his dice roll against a Target Characteristic. This is often a Characteristic, such as Clash, Volley or Resolve, but can also be more esoteric such as a Stand's capacity to Resist . When making one of these rolls you are looking to roll less than or equal to the desired Target Characteristic.
Whenever you compare a dice roll to a Characteristic it is referred to as a Characteristic Test.
Automatic Pass and Fail
If a rule calls upon you to roll a die and compare it to a Characteristic, i.e. a numerical representation of the Regiments' (or Characters') battlefield prowess, a result of "6" is always a failure, and with the exception of Defense Rolls, a result of "1" is always a success – regardless of other modifiers. Even the best troops experience bad luck, and even the lowest of the low deserve a chance at victory.
Re-Rolls
If a rule calls upon you to Re-Roll a die, simply pick it up and roll it again, abiding by the new result. Once a die has been Re-Rolled, it cannot be Re-Rolled again – regardless of the circumstances. In the event in which a rule calls for dice to be Re-Rolled that have already been Re-Rolled, any effects that would cause those dice to be Re-Rolled are ignored. Finally, should a rule or ability force you to Re-Roll a success whereas another rule would allow you to Re-Roll a fail, the two rules cancel each other out, and the Active Player Rolls without any Re-Rolls.
Roll Off
Occasionally, the rules will call upon you and your opponent to Roll Off. When this happens, you each roll a die – the one with the lowest result wins. If the result is a draw, Re-Roll. Keep Re-Rolling until there is a clear winner (this is an exception to the rule stating that you cannot Re-Roll a Re-Roll).
Measuring Distance
All distances in Conquest are measured in inches (˝), and are always measured from the closest points. When measuring the distance between two Regiments, always measure from the point of each Regiment closest to the other Regiment. When measuring the distance between two Stands, as in the case of measuring range, always measure from the point of each Stand closest to the other Stand.
You are permitted to check the distance at any time, so you can always know whether or not your warriors are in range before they attempt a particular Action.
Armies, Regiments, Stands and Models
In Conquest, each player commands an army of fantasy miniatures, ranging from shambling skeletons and iron-willed Dweghom Infantry to raging Avatara and rampaging dragons. This section covers how to arrange those miniatures in order to fight a battle.
The Army
Simply put, your Army is all the Models you are bringing to the battle, whether they're lowly Force- Grown Drones, mighty Brutes or anything in between. Normally, you will use an Army List to work out exactly which Models go into your army. Whenever the rules refer to Your Army, or a Friendly Stand or Regiment, they mean every Stand in every Regiment and any Characters in your Army. Whenever the rules refer to Your Opponent's Army, or Enemy Stand or Regiment, they mean every Stand in every Regiment and any Characters under your opponent's command.
Models
A Model is an individual miniature that is mounted on a circular base, subsequently placed in its relevant rectangular base, called a Stand. Looking at the miniatures on each Stand you are able to quickly identify what Regiment you're seeing as well as any Regiment upgrades e.g. Command Models or Officers.
Stands
When the rules refer to a Stand, they mean the whole rectangular base, including the Models mounted on it. For the purposes of the game, we treat the Models and their bases, however decorative, as part of the Stand. However, very few Stands – except for Monsters and Chariots – act alone. Most fight together.
Example: Infantry Models fight on rectangular Stands alongside their comrades. An Infantry Stand has room for four Infantry Models, whereas a Cavalry, Chariot, Brute or Monster Stand has room for only one Model.
As a Stand in a Regiment suffers Wounds, place a Wound Marker as a simple means of recording damage. Once the last Wound of a Stand is suffered, the Stand is removed as a casualty. All Stands in a Regiment mostly belong to the same Type. You would not, for example, have a mixed Regiment of Infantry and Cavalry Stands. Models on a Stand should be arranged, where possible, so they are facing in the same direction. This gives the Stand an easily identified front, a rear and two flanks, whose importance we will find out later. Stands are arranged together into Regiments.
Each Stand must have an appropriate number of Models represented on it, as shown below.
Types of Stand
In Conquest, every Stand has a Type.
- Infantry are easily identified by having four Models on each Stand.
- Cavalry are tougher and faster than Infantry, but rarer; always one Model per Stand.
- Brutes are huge creatures, often twice the height of a human; always one Model per Stand.
- Chariots are manned platforms pulled into battle by ferocious beasts, beasts of burden or even mechanical contraptions! Chariot Stands are easily identifiable by their long rectangular base, made up of two square stands back to back. These two stands together form one Chariot Stand on top of which a single Chariot Model is placed.
- Monsters are the rarest of all, each with the raw might to match dozens of other warriors and the girth to fill an entire Stand on its own!
Stands and size
In Conquest, every Stand Type has a different size for the purpose of determining Line of Sight as we will discuss later on.
- All Infantry Stands are considered to have a Size of 1.
- All Brute, Cavalry and Chariot Stands are considered to have a Size of 2.
- All Monster Stands are considered to have a Size of 3.
All Terrain features will also be assigned a Size. These values can vary as Terrain pieces are often hand-crafted and unique. We recommend these values as a guideline but encourage you to discuss this with your opponent and establish the size of the Terrain before each battle.
- All hills to be considered Size 2.
- All forests to be considered Size 3.
- Non-military buildings to be considered Size 2.
- Towers and wall fortifications to be considered Size 3.
When a Regiment, or a piece of Terrain, is placed on another piece of Terrain with a Size value, simply add the two sizes together to calculate whether they can see or be seen over intervening Terrain. This, however, only works for pieces of Terrain that a Regiment would naturally pass over rather than through (see Chapter 10 "Terrain" for more information).
Regiments
A Regiment is the basic fighting formation in Conquest. It can consist of anything from one individual Stand to dozens fighting side by side. Regiments mostly consist of the same Type of Stand, and usually all Stands in a Regiment share a common Characteristics profile. The most common exception is when the Regiment has been joined by a Character, a heroic individual who stands head and shoulders above even the elite of the rank and file and brings its own Special Rules, which we will discuss later (see page 96).
All Stands in a Regiment fight together – individual Stands cannot leave the Regiment and act independently. Again, the only exception to this is when the Regiment has been joined by a Character, which we will discuss later. Whenever a Regiment performs an Action, every Stand in the Regiment is considered to be performing that Action. Furthermore, should a Regiment gain a Special Rule or ability during the course of the Battle, it affects all Stands currently within that Regiment, including any attached Characters, as per the effect of the Special Rule or ability. However, unless otherwise stated, Characters' Special Rules do not affect the Regiment.
Special Rules, abilities and/or changes to a Regiment's Characteristic's Profile during Army List Building do not affect Characters. E.g. Hundred Kingdoms' "Veterans" Faction Rule.
Forming a Regiment
To form a Regiment, take all the Regiment's Stands and place them in an array of ranks (rows) and files (columns), edge to edge and corner to corner. All Stands in the Regiment must be facing in the same direction, giving the Regiment a front, a rear and two flanks. A Regiment can never have fewer than two Stands in its front rank, unless the starting size of the Regiment is one Stand or it has been reduced to one due to casualties.
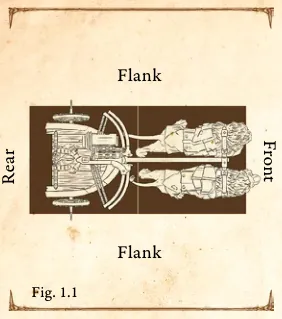
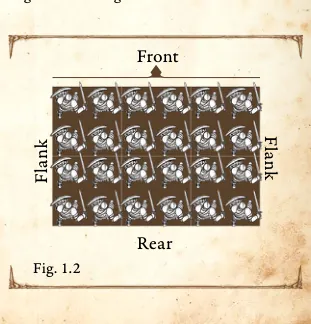
If possible, there should be an equal number of Stands in each rank. If this is not possible, the rear rank is left incomplete.
Placing Command Models
If an Infantry Regiment has any Command Models, i.e. a Leader, a Standard Bearer or any Officers, place them all on the Command Stand. The Command Stand can only contain up to four Command Models. Every Infantry Regiment must have a Command Stand even if it has no Command Models on it.
The Command Stand must be placed in the center of the front Rank or as close to the center as possible, in the case of an even number of Stands. You can find more information on Command Stands and how they work with different Types of Regiments on page 68.
Removing Casualties
Inevitably, some Stands will be removed from a Regiment as the battle progresses. Casualties are nearly always removed from the Regiment's rearmost rank. Should the casualties be suffered by a Regiment Engaged in melee, Casualties need to be removed in such a way as to not affect the number of Stands in contact with any Enemy Regiment(s). You can find more information on Removing Casualties in Chapter 5 "Allocating Wounds & Removing Casualties" page 54.
Legal Formations
A Regiment has a legal formation if:
- All its Stands are placed edge to edge and corner to corner;
- All ranks (with the possible exception of the rearmost) contain an equal number of Stands;
- All of the Stands are facing the same way;
- If there is a Stand that has suffered Wounds (i.e. does not have the starting number as its Wounds Characteristic), that Stand is in the rear rank;
- The Command Stand (if applicable) is in the center of the front rank;
- In the case of an incomplete Rearmost Rank, Stands must be placed as centered as possible;
Legal Conditions: As a handy guide, a Regiment's placement is considered legal when: a) No Stand in the Regiment overlaps another at the end of its Activation. b) No Regiment overlaps another at the end of its Activation. c) All Stands in a Regiment are entirely within the bounds of play (Battlefield) throughout their activation (except for the Actions that bring the Regiment onto the battlefield from Reinforcements).
Facing Arcs
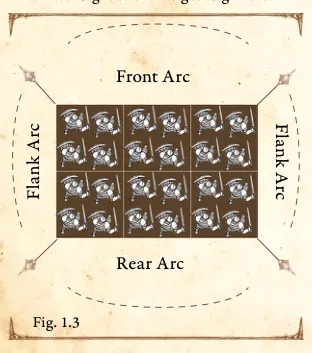
Each Regiment has a front arc, a rear arc and two flank arcs. These become important when the Regiment wishes to shoot at an Enemy, or when the Regiment charges into combat. To determine a Regiment's arcs, extend a 45° degree line from each of the Regiment's corners (Fig. 1.3). If the Regiment's Stands are square, you can do this by tracing a straight line from the corner Stand's inside back corner and extending it through its outside front corner.
Line of Sight
There are Actions in the game that require Line of Sight to a Target Regiment or Stand. To establish Line of Sight from one Regiment or Stand to another, the following criteria must be met:
- The Target Regiment or Stand must be within the Front Arc of the Acting Regiment, unless stated otherwise by a Special Rule.
- At least one Stand in the Acting Regiment's front Rank, must be able to draw an unobstructed line, 1mm wide, between the center of its front facing and the center of any facing of a Stand in the Target Regiment. Each Stand in the Acting Regiment's front Rank, must attempt to draw this unobstructed line.
- There are no other Regiments or pieces of Terrain of equal or larger size obstructing Line of Sight to the Target Regiment.
The Characteristic Profile
Each Stand has a Characteristic Profile as a measure of its ability on the Battlefield. The Characteristic Profile is broken down into two Categories, eight Characteristics, as well as a number of Special Rules and Draw Events.
Name: Sample Regiment
Class: Light
Type: Infantry
Draw Events: None
Special Rules: , (2)
Categories
These are used to streamline interaction between certain rules.
- Type tells you whether the Stand is Infantry, Cavalry, Brute or Monster. Different Types interact differently with some rules (do not worry, we will point them out when they come up). More importantly, Type also reminds you how many Models should be on a Stand: 4 for Infantry, and 1 for Brutes, Cavalry or Monsters.
- Class is a weight class, graded from Light to Medium to Heavy. Light troops are generally more maneuverable, arriving at the battle early, whereas Heavy troops inflict and sustain more damage but arrive later on the battlefield. This classification reflects how Regiments operate within their respective Faction's military structure. A Heavy Regiment equivalent in one Faction
may be a Medium in another. It all comes down to how a Faction deploys a certain Regiment in combat without it necessarily being a metric for a Regiment's destructive capabilities.
Characteristics
There are eight Characteristics in all, each one representing the Stand's comparative strength in that field. Most Characteristics run from 0 to 6, where 0 represents an inability to perform the associated Actions, a 1 is downright poor, and a 6 is amazing! Some Characteristics can reach values over 6, the most common ones being March and Wounds. Over the course of the game, Spells or Special Rules might cause a Stand's Characteristic to rise or fall. However, a Characteristic can never be reduced below 0.
Throughout the course of a game, you will be required to compare a dice roll to one of the Characteristics on a Stand's Profile. Whenever you are required to do so, it is called performing a Characteristic Test. When a rule refers to a Stand's "unmodified Characteristic", it is asking for the number printed in the respective Regiment's Characteristic Profile in its associated Army List entry. However, Rules and Abilities that allow a Regiment to increase a Characteristic during List Building count as unmodified. That also applies to the benefits a Regiment receives by purchasing an Officer upgrade during list building.
Unless stated otherwise, when a Special Rule, Draw Event, rule or ability provides a bonus to a Characteristic or to the (X) value of a Special Rule or Draw Event whilst also establishing a maximum value to it, that limitation remains for as long as that rule affects the Regiment.
Example: An Infantry Stand has an unmodified Resolve Characteristic of 3. When building your Army List, you have purchased an upgrade or made use of a Special Rule to increase the Resolve Characteristic value of that Regiment to 4. When a situation requires you to take an unmodified Morale Test during the game, you will treat the Regiment's unmodified Resolve Characteristic as 4 since the bonus was applied during List Building and not during the game, making it part of the Regiment's Characteristic Profile.
March (M): The March Characteristic determines how far a Stand can move.
Volley (V): Volley serves as a measure of the Stand's ability with ranged weapons, from javelins to shooting longbows, and even using mighty war machines.
Clash (C): The Clash Characteristic describes how effective a Stand is in the press of melee, governing its likelihood to strike a decisive blow against an enemy.
Attacks (A): Attacks tell us how many dice each Stand contributes when attacking an Enemy.
Wounds (W): Wounds indicate how many damaging blows a Stand can take before it is removed as a casualty.
Resolve (R): The Resolve Characteristic gives us a measure of the Stand's courage, and of the willingness of individual troops to hold fast when the battle turns against them.
Defense (D): Defense serves as a measure of physical resilience, combining the protection from any armor with the Stand's innate toughness.
Evasion (E): Evasion is another Defense Characteristic, but one that takes into account a Stand's ability to ignore harm through agility, resilience or magical protection, rather than endure through sheer hardness.
Draw Events & Special Rules
Under Draw Events, you will find a list of any Draw Events that the Regiment will be able to resolve during its Activation.
Under Special Rules, you will find a list of other abilities not governed by the Stand's Characteristics, such as (X), i.e the ability to reduce your opponent's Defense Characteristic. This is also where you'll find details of any ranged attack a Stand possesses, in the form of the (X) Special Rule.
Command Cards
Each Character and Regiment has a Command Card. Command Cards are used during the Command Phase to determine when a Regiment or Character acts. Each Command Card depicts the following details:
- The Regiment's or Character's Army List Entry. To remind you which profile from the Army List you use to represent the Regiment's or Character's abilities.
- An Artistic Depiction of the Regiment. To help you and your opponent quickly identify the depicted Regiment or Character on the table.
- A QR code scannable via our free Army Builder. To help you and your opponent quickly reference a Regiment's Rules through our Army Builder database. Make sure to scan the QR code through the Army Builder, scanning it through your device's camera app would result in an error!
"In Contact"
Many rules refer to two or more Stands being in contact with one another. A Stand is considered to be in contact with another Stand if they are touching in any way, including corner to corner. Two Regiments are considered to be in contact when their Stands are in contact with the Stands of another Regiment. For ease of comprehension the Rules also refer to this state as being "Engaged".
When more than one effect would apply at the same time then the Active Player, that is the Player whose turn it is to Activate a Regiment or Character, chooses the order with which the effects will be applied.
Last updated