Combat Actions
Chapter 4
On this page6
In this section you will find details on the various Actions that Regiments can take while in Combat.
Clash
Your Regiment can perform a Clash Action if it is in contact with at least one Enemy Regiment. When performing a Clash Action, all Stands in contact with an Enemy Stand – called Engaged Stands – direct their Attacks at the Regiment the Enemy Stand belongs to. This includes any Stands that are corner-to-corner.
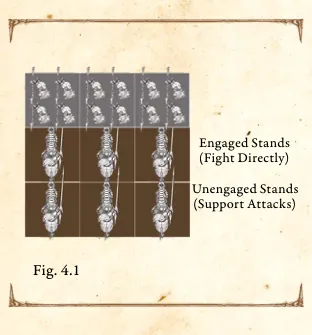
All Stands not in contact with an Enemy Stand are called Unengaged Stands. Unengaged Stands only contribute Attacks.
Calculating the Number of Attacks
Before Rolling To Hit, you need to determine the total number of Attacks being made.
Engaged Stands and Attacks
Each Engaged Stand makes a number of Attacks equal to its Attacks Characteristic.
Certain Special Rules and Draw Events can increase a Stand's Attacks Characteristic. This will increase the total number of Attacks a Stand generates by X when it performs its Attacks.
Unengaged Stands and Attacks
Each Unengaged Stand contributes 1 Attack, regardless of the Stand's Attack Characteristic. Certain Special Rules, such as the (X) Special Rule, can modify this number. Engaged Stands cannot perform Attacks.
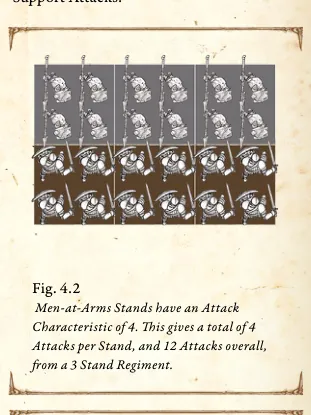
Men-at-Arms Stands have an Attack Characteristic of 4. This gives a total of 4 Attacks per Stand, and 12 Attacks overall, from a 3 Stand Regiment.
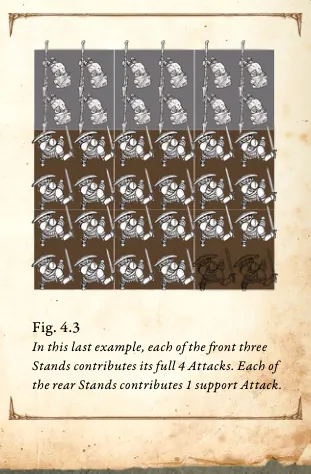
In this last example, each of the front three Stands contributes its full 4 Attacks. Each of the rear Stands contributes 1 support Attack.
Incomplete Ranks
If your Regiment is in contact with an Enemy Regiment's flank or rear (or your Regiment itself is being attacked from the flank or rear), you'll sometimes discover that some of its Stands are not in contact due to incomplete Ranks.
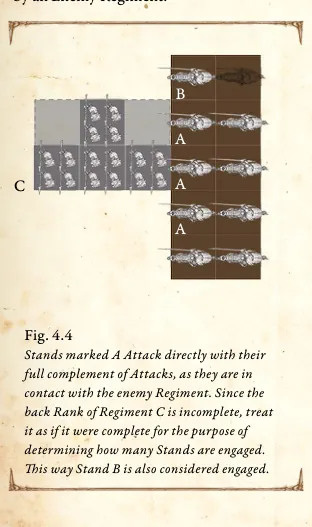
When this happens, treat the Regiment as being a rectangle as long and as wide as its most complete Rank, ignoring the gaps created by such incomplete Ranks. Each of your Stands in "contact" with this abstract rectangle is considered to be in contact for the purpose of calculating the number of Attacks.
This abstract rectangle is taken into account when a Regiment is in contact with another Enemy Regiment is Charging or being Charged by an Enemy Regiment.
Stands marked A Attack directly with their full complement of Attacks, as they are in contact with the enemy Regiment. Since the back Rank of Regiment C is incomplete, treat it as if it were complete for the purpose of determining how many Stands are engaged. This way Stand B is also considered engaged.
More Than One Target
If your Regiment is in contact with two or more enemy Regiments, chances are that some of the Stands will be Engaged with Stands from two or more different Enemy Regiments.
If your Stand is in contact with Stands from two or more Enemy Regiments, you choose which Regiment each of your Engaged Stands Attack
- direct all of the Stand's Attacks at the Target of your choice without splitting its Attacks. Similarly, you can choose which of the Enemy Regiments each of your Unengaged Stands Attack. Attacks from a single Stand cannot be split between two Enemy Regiments. In other words, if a Stand is contributing Attacks, it may do so against one (and only one) Enemy Regiment in contact with its Regiment.
Resolve each pool of Attacks separately, from Rolling To Hit all the way through to Testing Morale.
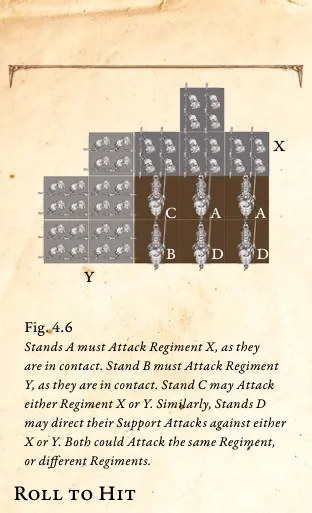
Stands A must Attack Regiment X, as they are in contact. Stand B must Attack Regiment Y, as they are in contact. Stand C may Attack either Regiment X or Y. Similarly, Stands D may direct their Support Attacks against either X or Y. Both could Attack the same Regiment, or different Regiments.
Roll to Hit
Roll a number of dice equal to the Attacks being made.
Any die that is less than or equal to your Regiment's Clash Characteristic is a Hit.
Any die that is greater than your Regiment's Clash Characteristic is a Miss, commonly referred to as a failed Hit. Should the Clash Characteristic of a Stand be 6 or above, that Stand gains the Special Rule.
Example: Your Regiment of Force Grown Drones (Clash 1) are Attacking an Enemy Regiment for a total of 20 Attacks. You roll 20 dice. Any result of a 1 is a Hit. Any results of a 2 or greater are Misses.
Flank & Rear Attacks
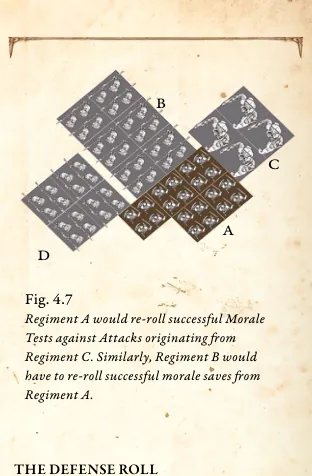
If the Active Regiment is Attacking the Enemy in the or Rear, your opponent must Re-Roll any successful Morale Tests (page 12).
If the Active Regiment is Attacking the Enemy in the Rear, your opponent automatically fails all Morale Tests.
Regiment A would re-roll successful Morale Tests against Attacks originating from Regiment C. Similarly, Regiment B would have to re-roll successful morale saves from Regiment A.
The Defense Roll
Now, your opponent rolls a number of dice equal to the number of Hits your Stands have inflicted.
Any roll that is less than or equal to the Regiment's Defense or Evasion Characteristic, after any modifiers, is a successful Defense Roll. The Regiment's armor or reflexes have saved them on this occasion!
Any roll that is greater than both the Regiment's Defense and Evasion Characteristics, after any modifiers, is a failed Defense Roll and the Regiment suffers a Wound as a result.
Note that you only make one roll, which is then compared to both the Defense and Evasion Characteristics. Also note that the Defense Roll is an exception to the rule that any die roll of "1" is an automatic success.
If your Regiment has a Defense and Evasion of 0 (or has its Characteristics reduced to 0 by a Special Rule), it cannot pass a Defense Roll.
: Your Regiment of Gilded Legion (Defense 3) suffers 6 Hits. You therefore roll 6 dice, needing to roll a 3 or less on each. You roll 1, 1, 2, 4, 4, 5. Three results are equal to or less than 3, preventing 3 of the possible 6 Wounds.
: Your Regiment of Clones Infiltrators (Defense 1, Evasion 2) suffers 6 Hits. As your Evasion is higher than your Defense, you therefore need to roll a 2 or less on each die. You roll a 1, 2, 2, 3, 3, 5, preventing 3 of the possible 6 Wounds.
Example 3: Your Regiment of Centaur Avatara (Defense 3, Evasion 1) suffers 4 Hits with the Special Rule, which reduces their Defense to 0 for those Hits. You therefore need to roll equal to or lower than the Evasion Characteristic of 1 to prevent any Wounds.
Removing Casualties and Testing Morale
Keep a tally of the Wounds the Regiment has taken and proceed to the Removing Casualties step (see page 54). After that, your opponent may have to Test Morale (see page 60).
Combat Rally
Only a Regiment with the Broken Status can perform a Combat Rally Action. If a Regiment performs a Combat Rally Action, it is no longer Broken. Remove the Broken Marker.
Combat Reform
A Combat Reform Action allows a Regiment to change its formation (the configuration of its Ranks and Files) while in contact with one or more Enemy Regiments. You cannot use a Combat Reform to reduce the total number of Stands in contact.
When performing a Combat Reform Action, roll a die. If the result is less than or equal to the highest Resolve Characteristic a Stand in the Regiment has, the Regiment has made a Clean Reform. If the result is greater than the highest Resolve Characteristic a Stand in your Regiment has, your Regiment has made a Fighting Reform.
Clean Reform
If your Regiment performs a Clean Reform, immediately put your Regiment in Legal Formation without decreasing the amount of stands in contact with Engaged Enemy Regiments. You cannot increase the number of stands in your front rank by more than 2 during this action. Single Stand Regiments should align as much of their stand as possible against Engaged Regiments.
You cannot increase the number of Stands in your front rank by more than 2 during this Action.
Single Stand Regiments should align flush as much of their Stand as possible against Engaged Regiments. (see page 13 for more on legal formations).
Finally, the reforming Regiment may not find itself in a different facing of the Engaged Regiment than the one it was before performing the Reform.
Fighting Reform
If your Regiment makes a Fighting Reform it suffers 1 Wound for each of its Stands in contact with an Enemy Regiment. Once any casualties have been removed, and Morale Tests taken, the Regiment adopts a new legal formation as per a Clean Reform.
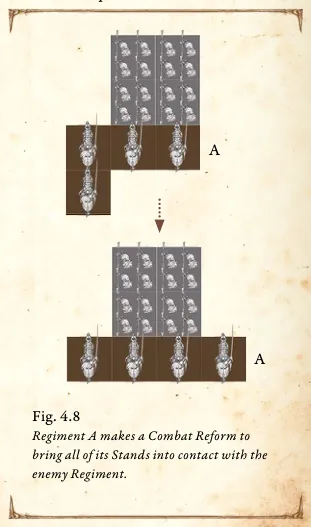
Regiment A makes a Combat Reform to bring all of its Stands into contact with the enemy Regiment.
Inspire
When a Regiment performs the Inspire Action, the Regiment gains the Special Rule until the end of its Activation.
: This Regiment adds +1 to its Clash Characteristic until the end of the Regiment's Activation. If this modifies the Clash Characteristic to a 5 or greater, it does not receive the +1 Clash but instead may Re-Roll unmodified Hit Rolls of "6". The +1 to the Clash Characteristic from the Special Rule is always added in after all other Clash modifying rules have been applied.
Example: A Men-At-Arms Regiment (Clash 2) performs an Inspire Action as its first Action during its Activation. The Regiment thus gains the Special Rule until the end of its Activation. Therefore, when it performs its second Action and Clashes it will now do so with Clash 3. Once the Regiment finishes its Activation, it loses the Special Rule.
Example: A Dragonslayers Regiment (Clash 4) performs an Inspire Action as its first Action during its Activation and then proceeds to perform a Clash. During the Clash Action their Clash of 4 would not change but instead Re-Roll unmodified rolls of "6". Once the Regiment finishes its Activation, it loses the Special Rule.
Withdraw
A Withdraw Action is taken in order to remove your Regiment from melee. It can only be used by a Light or Medium Regiment, and only if the Regiment is in contact with one or more enemy Regiments. A Regiment performing this Action only counts as having performed a Withdraw Action.
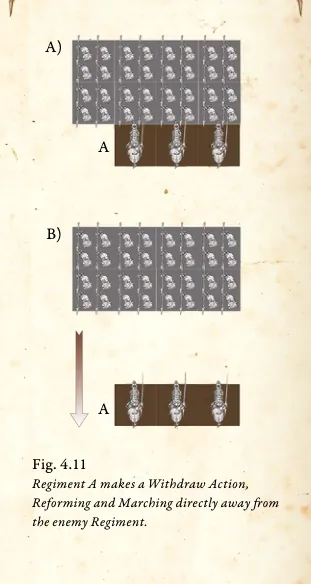
Regiment A makes a Withdraw Action, Reforming and Marching directly away from the enemy Regiment.
When taking a Withdraw Action, roll a die. If the result is less than or equal to the highest Resolve Characteristic of any Stand in your Regiment, the Regiment has made a Clean Withdrawal.
If the result is greater than the highest Resolve Characteristic of a Stand in your Regiment, your Regiment has made a Fighting Withdrawal.
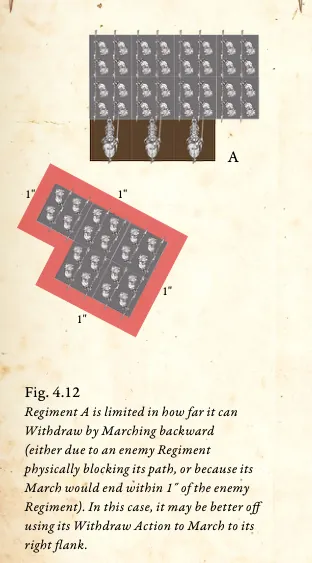
Regiment A is limited in how far it can Withdraw by Marching backward (either due to an enemy Regiment physically blocking its path, or because its March would end within 1˝ of the enemy Regiment). In this case, it may be better off using its Withdraw Action to March to its right flank.
Clean Withdrawal
If your Regiment makes a Clean Withdrawal, it immediately suffers D6 Wounds (as even the best executed Withdrawal is a risky endeavor), reforms facing away from the enemy Regiment(s) and immediately performs an out-of-sequence March Action (as part of this Withdraw Action) following the rules given on page 28. Remember that a Regiment cannot end its March within 1˝ of an Enemy Regiment or Garrison Terrain. If the March cannot be completed for any reason, return the Regiment to its original position – the Withdraw Action has failed.
Note that a regiment making a Withdraw Action must keep its formation following the reform. This merely allows the Regiment to rotate on its axis and March away.
Fighting Withdrawal
If your Regiment makes a Fighting Withdrawal, it immediately suffers D6 Wounds (roll one die) for each of its Stands in contact with an Enemy Stand. That is rolling 1 D6 and applying the indicated number of Wounds for all Stands in contact with an Enemy Stand. Once any Casualties have been removed and Morale Tests taken, it reforms facing away from the Enemy Regiment(s) and immediately performs an out-of-sequence March Action (as part of this Withdraw Action) following the rules described above for Clean Withdrawal.
Pass
A Regiment or Character may opt to Pass instead of performing an Action. The Regiment or Character passes an Action without being treated as having performed an Action.
A Regiment or Character may opt to Pass any and all of its available Actions if it so wishes. If it chooses to Pass all of its Actions it will count as having Activated but not as having performed any Actions.
Last updated