Out-of-combat Actions
Chapter 3
On this page7
In this section you will find details on the various Actions that Regiments can take while Out-of-Combat.
March
Your Regiment can only take a March Action if it is not in contact with an Enemy Regiment. If your Regiment is in contact with an Enemy Regiment, you might instead want to perform a Withdraw Action (see page 50).
Marching is the only Action a Regiment can perform more than once during a Round, without any Special Rules indicating otherwise.
March Distance
A Regiment Marches a distance, in inches, up to its March Characteristic. If there is more than one March Characteristic present in the Regiment,it must instead March up to the lowest March Characteristic present.
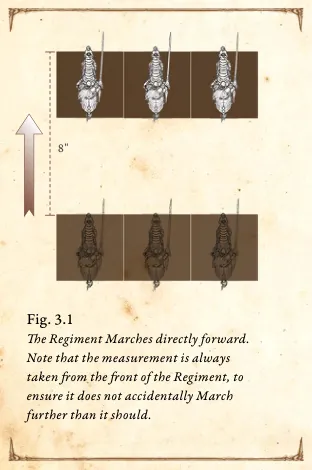
The Regiment Marches directly forward. Note that the measurement is always taken from the front of the Regiment, to ensure it does not accidentally March further than it should.
Direction of March
A Marching Regiment normally moves only in one direction during the course of a single March. However, it may Wheel during its move. In addition, a Regiment may choose to move directly sideways or backward but only up to half its regular March distance.
A Regiment performing a March Action cannot move in more than one direction during the same Action, outside of performing a Wheel. This means that you cannot move forward and then sideways or backward at half speed in the same Action.
Performing a Wheel
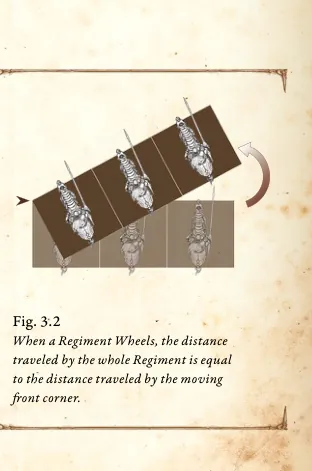
To perform a Wheel, a Regiment pivots around one of its front corners, using the distance traveled by the opposite front corner as the distance traveled during the Wheel.
The front corner moved as a result of that pivot may only move forwards. Once the Wheel is complete, the Regiment may then continue moving directly forward.
When a Regiment Wheels, the distance traveled by the whole Regiment is equal to the distance traveled by the moving front corner.
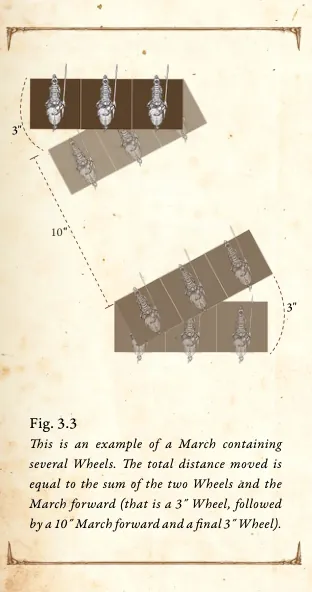
A Marching Regiment may Wheel several times during its March, provided that its overall move is not greater than its lowest March Characteristic.
March Restrictions
A Regiment may not March to within 1˝ of an Enemy Regiment or Garrison Terrain.
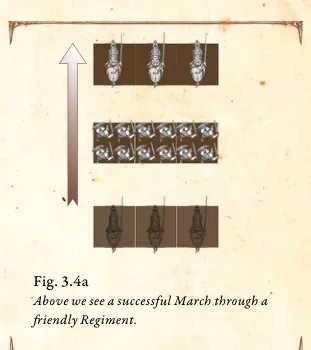
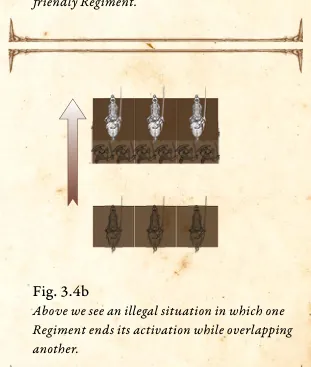
However, a Regiment may freely March through any friendly Regiments that are not in contact with any Enemy Regiments, provided that at the end of its March or chain of continuous March Actions the Regiment is not in an illegal position.
This is an example of a March containing several Wheels. The total distance moved is equal to the sum of the two Wheels and the March forward (that is a 3˝ Wheel, followed by a 10˝ March forward and a final 3˝ Wheel).
March Through
A Regiment that uses a March Action may march through friendly Regiments without penalty. However, it can only do so if it has sufficient March distance to pass through all such obstructions. If a single March Action is not enough to clear all such obstructions, a Regiment may use its second March Action to ensure it ends in a legal position.
Fig. 3.4a — Above we see a successful March through a friendly Regiment.
Fig. 3.4b — Above we see an illegal situation in which one Regiment ends its activation while overlapping another.
A Regiment cannot March through Enemy Regiments, friendly Regiments that are in contact with any Enemy Regiments or a Garrison Terrain occupied by an Enemy Regiment.
Reinforcement Zone & Reinforcement Line
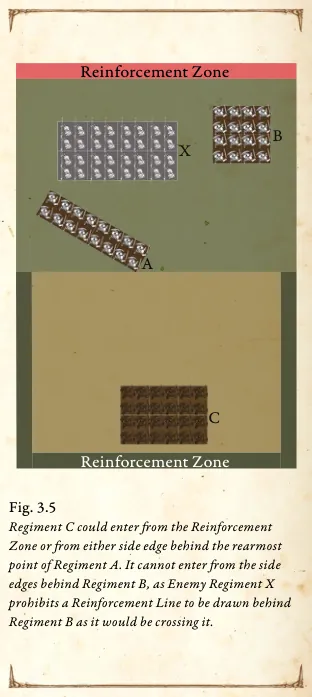
Each Player's Reinforcement Zone is their table edge. The Reinforcement Line is determined at the beginning of each Round before the start of the Reinforcement Phase. To determine the Reinforcement Line, draw a line that is parallel to the Players' Reinforcement Zones, intersecting the rearmost corner of the foremost Friendly Regiment. If no Enemy Regiment is crossing this Reinforcement Line then it is set there.
Should an Enemy Regiment crosses that Reinforcement Line then it is pushed backward to the rearmost corner of the next foremost Friendly Regiment until no Enemy Regiment is crossing that Reinforcement Line.
For ease of reference a Player may place a marker on each side of the Battlefield where the Reinforcement Line meets the edges to keep track of it.
A Reinforcement Line may not move further forward from where it was set at the beginning of the Round; it may only be pushed backward to the rearmost corner of the next foremost Friendly Regiment. A Reinforcement Line may be pushed backward either because the foremost Friendly Regiment has been destroyed or an Enemy Regiment has its foremost corner crossing a Player's Reinforcement Line.
A Player keeps moving their Reinforcement Line backward until no Enemy Regiment is crossing their Reinforcement Line or it is pushed all the way back to a Player's Reinforcement Zone. Should throughout the Round, a Friendly Regiment find itself past its current Reinforcement Line, the Player checks to see if a new Reinforcement Line can be drawn following the steps above.This new Reinforcement Line cannot be further forward from where it was set at the beginning of the Round. If however, the Friendly Regiment moves further forward from where the Reinforcement Line was set at the beginning of the Round and would otherwise be able to draw a Reinforcement Line, then the Reinforcement Line returns to where it was set at the beginning of the Round.
The Reinforcement Line is determined anew for every Player at the start of the next Round.
Regiment C could enter from the Reinforcement Zone or from either side edge behind the rearmost point of Regiment A. It cannot enter from the side edges behind Regiment B, as Enemy Regiment X prohibits a Reinforcement Line to be drawn behind Regiment B as it would be crossing it.
Reinforcements Marching onto the Battlefield
A Regiment may always March from Reinforcements onto the Battlefield from your Reinforcement Zone. Place the front edge of the Regiment's front Rank so it is touching the battlefield edge, and then complete the March as normal, measuring from the edge of the Battlefield rather than the front of the Regiment as you normally would.
If one March Action is not enough to bring all of the Regiment's Stands onto the battlefield, then it must perform a second March Action to ensure all of its Stands are on the Battlefield. When a Regiment is entering the Battlefield, it must assume a formation and a point of entering that would allow it to do so.
Alternatively, you may bring your Reinforcements onto the Battlefield from side edges, provided that the point of entry is between your Reinforcement Zone and your Reinforcement Line.
Failed Reinforcement
If it is not possible for the Regiment to enter the Battlefield according to the rules given above, the Regiment returns to Reinforcements. In the next Round that Regiment is considered to have automatically passed its Reinforcement Roll and may attempt to March onto the Battlefield as normal.
This automatic pass does not count towards the Regiment a Player chooses to automatically come into the Battlefield from Reinforcements each Round. If a Regiment can enter the Battlefield, then it must do so.
Charge
A Charge Action is the only way a Regiment can move into contact with an enemy Regiment (and therefore able to Clash with that enemy Regiment). A Regiment cannot perform a Charge Action during the Round in which it has arrived from Reinforcements.
Declaring a Charge
When declaring a Charge, you may only choose one Enemy Regiment to be the Target of your Charge and it must be within your front arc and within Line of Sight. You cannot choose more than one Regiment as the Target of a Charge.
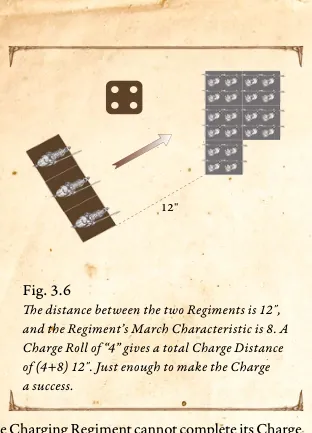
Roll a die – this is the Charge Roll. Add the Charge Roll to the Regiment's lowest March Characteristic. This is the Charge Distance. If the Charge Distance is greater than or equal to the distance, in inches, between the Charging Regiment and the Target Regiment, the Charge is successful. If the total is less than the distance between the Charging Regiment and the Target Regiment, the Charge is failed (see "Failing a Charge" further below).
An Enemy Regiment is not a legal Charge Target if it is outside the maximum possible Charge Distance, taking into account all Special Rules and Abilities that would allow you to Charge further away, e.g. the Hundred Kingdoms Tourney Champion.
The Charge Move
If the Charge is successful, you may now move the Charging Regiment into contact with the Enemy Regiment, as if it was performing a March Action, but may only move directly forward. This is called the Charge Move.
Your Regiment is only permitted a single free Wheel, up to 90⁰, following Wheeling rules, performed at the beginning of the Charge Move. The purpose of this Wheel is to ensure that the subsequent Charge Move and final pivot (which will be explained later) Engages as many of the Charging Regiment's front- Rank Stands with as many of the Target Regiment's Stands as possible.
Moreover, each of the Charging Regiment's front- Rank Stands should Engage as many of the Target Regiment's Stands as possible. In addition, Charging Single Stand Regiments should align flush as much of their Stand as possible against their Charge Target.
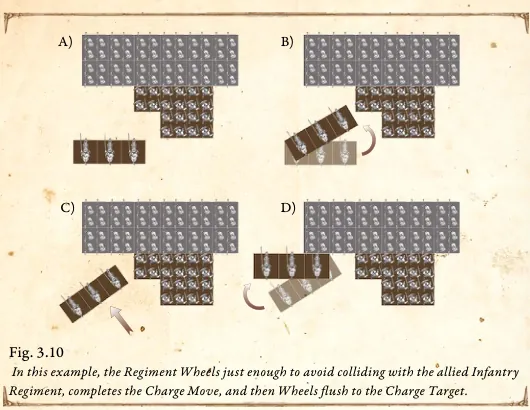
The free Wheel does not count toward the Charge Distance moved. Once the Regiment is aligned, its Charge Move may have it move through other Friendly Regiments not currently in contact with an Enemy Regiment, provided that it does not end up in an illegal position once the Charge is finalized.
The distance between the two Regiments is 12˝, and the Regiment's March Characteristic is 8. A Charge Roll of "4" gives a total Charge Distance of (4+8) 12˝. Just enough to make the Charge a success.
If the Charging Regiment cannot complete its Charge Move against the Target Regiment because its path is blocked by another Enemy Regiment, Garrison Terrain or Impassable Terrain, the Charge Action automatically fails (see "Failing a Charge" further below). A Charging Regiment may come within 1˝ of other Enemy Regiments and Garrison Terrain during a Charge Move. However, it may not come in contact with an Enemy Regiment or piece of Garrison Terrain it did not declare a Charge against as part of its Charge Action.
Finalizing The Charge
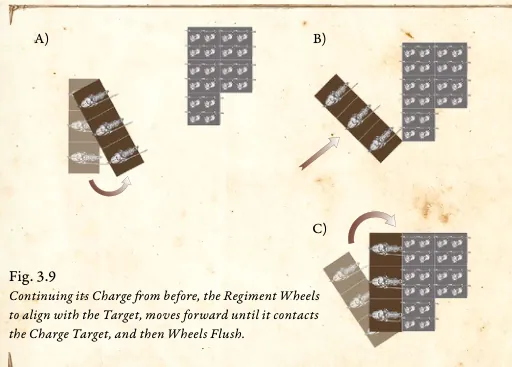
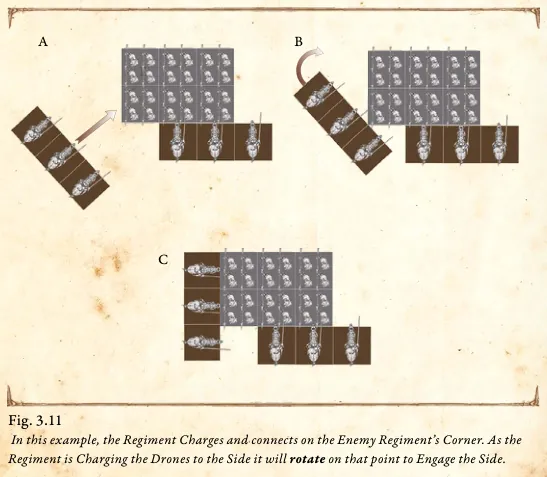
As soon as the Charging Regiment contacts the Target Regiment, it stops moving. Then it Engages the Target Regiment's Stands by rotating up to 90⁰ at the point the Regiments come in contact, in a movement similar to "closing a door", until both the Charging Regiment's front and the Target Regiment are in contact on the Charged facing.
If the Charging Regiment cannot pivot flush to the Target Regiment (because of Terrain or another Regiment being in the way), then the Target Regiment pivots in order to bring its Charged facing into contact with the Charging Regiment's front arc. In the case where the Target Regiment is already Engaged with another Regiment, it does not pivot and the Charge Action automatically fails (see "Failing a Charge" further below).
Should your opponent have placed their Regiments in such a way as to make it impossible to come into contact with the Target Regiment without coming into contact with another Regiment as well, push the offending unengaged Enemy Regiment a maximum of 1" directly away from the Charging Regiment and complete the pivot.
A Regiment that is being pushed in this way performs a 1" move directly away from the Charging Regiment even if that move will require the Regiment to move diagonally, moving a full 1". This 1" push does not allow the Regiment to end up in an illegal position. If that 1" push is still not enough for the Regiments to complete the Charge then the Charge Action automatically fails (see "Failing a Charge" further below).
Charging Through
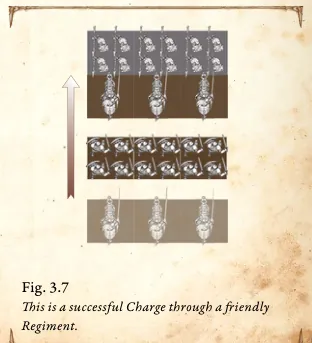
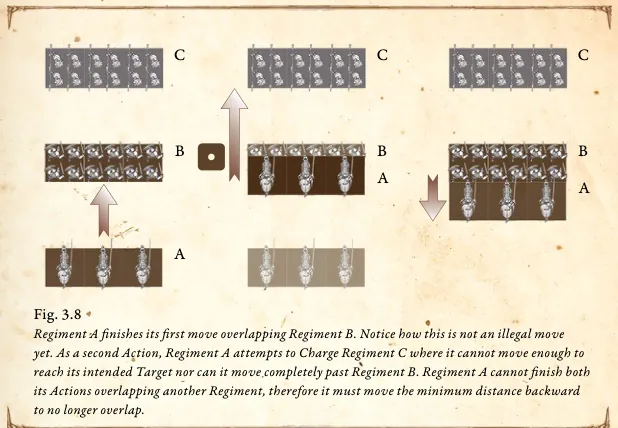
A Regiment is allowed to move through Friendly Regiments that are not in contact with an Enemy Regiment when performing a Charge Action. This can be the result of a Charge Action, but also as part of a sequence of Actions such as Marching and then Charging even if that first March has the Regiment overlapping with a Friendly Regiment.
If the combined movement total of the Actions is not enough to completely clear the Friendly Regiment (or if there is not enough space for the Charging Regiment to completely clear the Friendly Regiment), then the Charge Action automatically fails (see "Failing a Charge" later on).
This is a successful Charge through a friendly Regiment.
Regiment A finishes its first move overlapping Regiment B. Notice how this is not an illegal move yet. As a second Action, Regiment A attempts to Charge Regiment C where it cannot move enough to reach its intended Target nor can it move completely past Regiment B. Regiment A cannot finish both its Actions overlapping another Regiment, therefore it must move the minimum distance backward to no longer overlap.
Continuing its Charge from before, the Regiment Wheels to align with the Target, moves forward until it contacts the Charge Target, and then Wheels Flush.
In this example, the Regiment Wheels just enough to avoid colliding with the allied Infantry Regiment, completes the Charge Move, and then Wheels flush to the Charge Target.
In this example, the Regiment Charges and connects on the Enemy Regiment's Corner. As the Regiment is Charging the Drones to the Side it will rotate on that point to Engage the Side.
Which Facing?
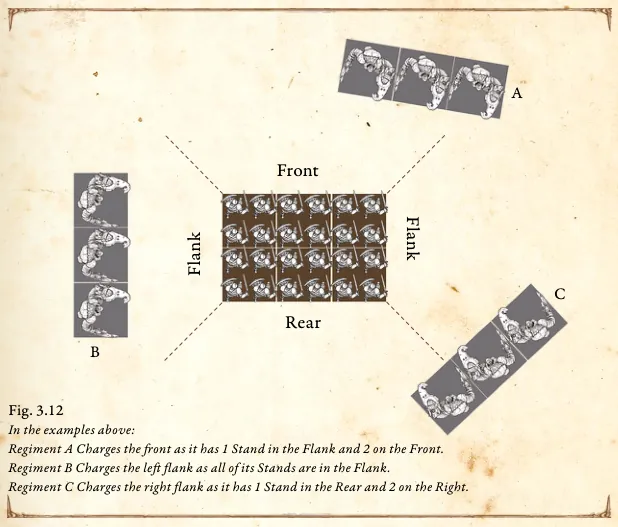
A Regiment Charges a Target Regiment in the facing the majority of the Charging Regiment's Front Rank Stands are in when the Charge Action is declared. In the case where a Charging Regiment does not have the majority of its Front Rank Stands in a specific facing but has an equal amount of Stands in more than one facing then the Charging Regiments may choose which facing to Charge to. A Stand may find itself in more than one facing. Should that happen then the Stand counts as being in both facings.
A Single Stand Regiment Charges a Target Regiment in the facing the majority of its Stand is in when the Charge Action is declared. Make sure to remember that a Chariot Regiment's Stand is considered to be a single Stand! Similarly a Character attached to a Monster Regiment is also considered to be a single Stand.
Regiment A Charges the front as it has 1 Stand in the Flank and 2 on the Front. Regiment B Charges the left flank as all of its Stands are in the Flank. Regiment C Charges the right flank as it has 1 Stand in the Rear and 2 on the Right.
Charging and Inspire
Upon completion of a successful Charge Action, the Regiment immediately gains the "" Special Rule (see page 99). Note that the "" Special Rule does not affect Attacks and is in effect wasted if the Regiment has no Actions left this Round, as it lasts until the end of the Regiment's Activation.
Failing a Charge
If the Regiment's Charge Distance is less than the distance between the Charging Regiment and the Target Regiment, the Charge is failed. The Charging Regiment moves directly forward a distance equal to the result on the die of the Charge Roll, halting 1˝ away from any Enemy Regiment and any piece of Garrison Terrain.
If the Charging Regiment cannot complete its Charge Move against the Target Regiment because its path is blocked by another Enemy Regiment, Garrison Terrain or Impassable Terrain, it stops its Charge Move, halting 1˝ away from any Enemy Regiment and any piece of Garrison Terrain.
If during the "Charging Through" part of a Charge the combined movement total of the Actions is not enough to completely clear the Friendly Regiment (or if there is not enough space for the Charging Regiment to completely clear the Friendly Regiment) the Charge is failed. The Charging Regiment immediately moves the minimum amount needed to no longer overlap with the Friendly Regiment and both Regiments become Broken.
If during the "Finalizing the Charge" part of the Charge, the Regiment has made contact with the Target Regiment but neither one can pivot flush, the Charging Regiment performs a 1" move directly away from the Target Regiment, from the position the Charging Regiment was in when it initially made contact, moving backwards a full 1", halting 1˝ away from any Enemy Regiment and any piece of Garrison Terrain.
If halting 1" away from any Enemy Regiment and any piece of Garrison Terrain is not possible it halts as far away as possible and the Player ensures that its next Activation will bring it in a legal position.
Should an unengaged Enemy Regiment(s) be pushed 1" during the process of Finalizing the Charge then that pushed Regiment (s) return to where they were before that push.
If a Regiment fails a Charge Action, it loses all other Actions remaining this Round and its Activation ends.
Impact Attacks
Some troops – such as knights – rely on the sheer, overwhelming force of their impact to inflict damage on the foe.
Once a successful Charge is completed, Attacks are immediately resolved as part of the Charge Action. Attacks are only inflicted by Stands that have the (X) Special Rule.
Stands in the Regiment inflict Attacks equal to the X value in their (X) Special Rule. Attacks are resolved similarly to Clash Attacks in terms of Rolling to Hit, Defense Rolls and Morale Tests (see page 46). However, they do not benefit from any Special Rules that specifically affect Attacks made during a Clash Action. Unengaged Stands contribute Attacks as normal equal to their (X) value.
Take Aim
When a Regiment performs the Take Aim Action, the Regiment gains the Special Rule until the end of its Activation.
Rally
Only a Regiment with the Broken Status can perform a Rally Action. If a Regiment performs a Rally Action, it is no longer Broken. Remove the Broken Marker.
Reform
A Reform Action allows a Regiment to change its formation (its combination of Ranks and Files). A Reform Action, just like a March, can be performed more than once during a Regiment's Activation. To do this, a Reform is broken down into two steps that are performed in order:
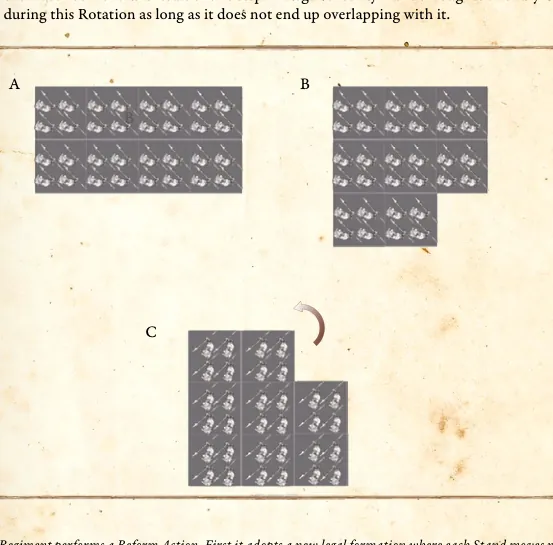
1) Stands other than the Command Stand in the Reforming Regiment may change their position in the same Rank or between Ranks adopting a new, legal formation (see page 13 for more on legal formations) but no Stand may move more than its March Characteristic. New Ranks can only be added to the rear of the Regiment in this way. For all intents and purposes the Stands count as "moving" and so cannot end up overlapping with another Regiment or come within 1" of an Enemy Regiment. The Command Stand cannot move as a result of this step.
2) The Regiment may rotate using the Regiment's center, up to 180°. Unlike a Combat Reform, the center of the Regiment must not move as a result of this step. A Regiment may move through a Friendly Unengaged Regiment during this Rotation as long as it does not end up overlapping with it.
Above, the Regiment performs a Reform Action. First it adopts a new legal formation where each Stand moves no more than its March Characteristic. Once this is over and a new center has been established for the Regiment, the Regiment rotate on its center up to 180°. During that second step (C) it is irrelevant how much each Stand has moved.
Volley
A Volley Action can only be used if an unengaged Regiment has at least one Stand with the (X) Special Rule – otherwise, it does not have a ranged weapon with which to make a Volley.
Choosing a Target and Line of Sight
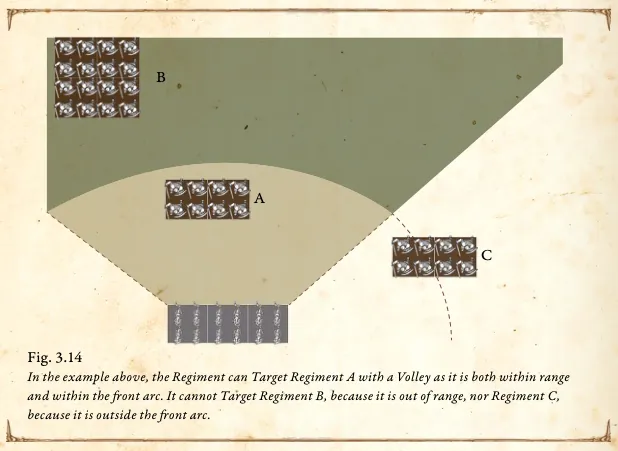
In order to check if a Volley Action can be declared, first determine whether at least one Stand of the Target Regiment is within Line of Sight and Range of the Volleying Regiment. If the Target Regiment is outside Line of Sight and/or Range then you may not declare a Volley Action against that Target unless a Special Rule states otherwise. A Regiment performing a Volley Action cannot divide any of its Stand's shots amongst multiple Targets. All Stands in the Regiment must Target the same Enemy Regiment.
In the example above, the Regiment can Target Regiment A with a Volley as it is both within range and within the front arc. It cannot Target Regiment B, because it is out of range, nor Regiment C, because it is outside the front arc.
Check for Obstruction
For each Stand in the Front Rank of the Volleying Regiment, trace a straight line, 1mm wide and as long as the Stand's Range, between the center of the Volleying Stand's front facing and any point of any Stand in the Target Regiment.
If the line is not long enough to reach any point of any Stand in the Target Regiment then the Stand does not contribute any shots to the Volley.
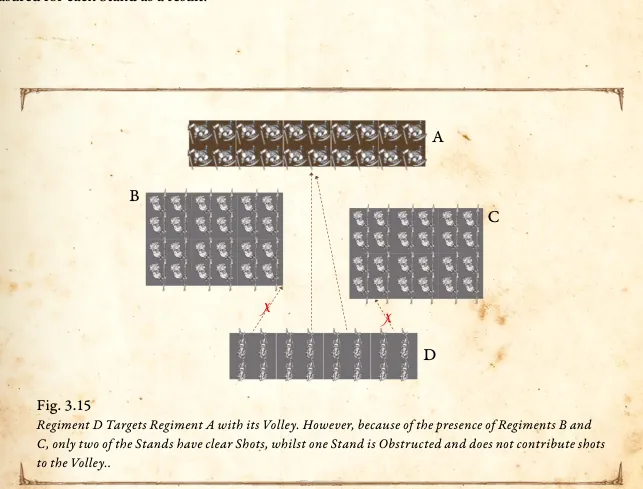
If the line is interrupted by any Regiments or pieces of Obstructing Terrain of a Size equal to or larger than both the Size of the Volleying Regiment and the Target Regiment, then the shot is Obstructed and the Stand does not contribute any shots to the Volley regardless of whether its target is within Range.
If the line is not interrupted by Regiments or Obstructing Terrain, that Stand's Volley is a Clear Shot. Regiments and pieces of Terrain of a smaller Size than the Volleying Regiment are ignored, as are
Regiments and Terrain of a smaller size than the Target. A Regiment can be targeted if it is in contact with an Enemy Regiment following all rules for Choosing a Target and Checking for Obstruction as normal.
Check For Effective Range
You're nearly ready to unleash your Volley! First, however, you need to check if your Stands are shooting within Effective Range. The Range given for the (X) Special Rule is not the Stand's optimal Range, but its maximum Range. Although Hits are possible at maximum Range, and quite deadly, Volleys are always more effective when unleashed at shorter ranges.
To represent this, if the distance between Stands in the Volleying Regiment and the Target is less than half the range of the Volleying Regiment's (X) Special Rule, then each of the Volleying Stands that are within that range receive a +1 bonus to their (X) Special Rule. This is called the Effective Range.
It is entirely possible that, when checking for Effective Range, some of the Volleying Regiment's Stands are within Effective Range and some others are not. It is also entirely possible that certain Stands would have to draw Line of Sight to their Target through pieces of Terrain or to different arcs that other Stands in the Regiment will not.
In this case, Stands that are within Effective Range would receive the +1 bonus to their (X) Special Rule while Stands that are not within Effective range would not, and Effective Range would have to be measured for each Stand as a result.
Regiment D Targets Regiment A with its Volley. However, because of the presence of Regiments B and C, only two of the Stands have clear Shots, whilst one Stand is Obstructed and does not contribute shots to the Volley..
Stands In Multiple Arcs
Stands in a Regiment perform Volley Attacks against the Target Regiment's arc they are in. It is possible for different Stands in the same Regiment to be within different arcs of the same Target Regiment. In this case each Stand performs its Volley Attacks against the arc they are in. Should a Stand be within more than one arc then it may choose which arc to direct its Volley Attacks against.
Volley Attacks against each arc are resolved separately but simultaneously. Keep separate track of Hits and Wounds inflicted on each arc as Defense and/ or Morale Tests may be subject to different effects and Special Rules.
Example: A Regiment does not benefit from the Special Rule when Hits are inflicted on its or Rear. Similarly Volley Attacks that cause the Target Regiment to take Morale Tests are affected when Hits are inflicted on the Target Regiment's or Rear.
Determine the Number of Shots
A Stand on the first rank making a Clear Shot fires a number of shots equal to the (X) in this Stand's (X) Special Rule.
If a Stand's shot is Obstructed, then it contributes no Shots when the Regiment performs a Volley Action. Stands in any Rank other than the first do not contribute any shots to the Volley.
To determine the number of Shots, first calculate the total dice contributed by each Stand in the first rank and add any additional shots that come up as a result of a rule or special ability, e.g. firing within Effective Range.
Then, once the number of Shots is determined you then apply any negative modifiers that would reduce your total number of Shots e.g. The Special Rule or Cover Terrain.
Rolling to Hit
Roll a number of dice equal to the Shots being fired.
Any die that is less than or equal to your Stand's Volley Characteristic is a Hit.
Any die that is greater than your Stand's Volley Characteristic is a Miss. Should the Volley Characteristic of the Volleying Stand be 6 or above, that Stand gains the Special Rule.
Example: Your 3 Stand Infantry Regiment (Volley 2 and (3)) are Volleying at an Enemy Regiment for a total of 9 Shots. You roll 9 dice. Any result of a 1 or 2 is a Hit. Any result of a 3 or more is a Miss. Should the Volley Characteristic of the Volleying Regiment be a 6 or above, every roll of a 1 inflicts 2 Hits instead of 1 due to the Special Rule.
The Defense Roll
Now, your opponent rolls a number of dice equal to the number of Hits scored by the Volleying Regiment.
Any roll that is less than or equal to their Regiment's Defense or Evasion Characteristic, after any modifiers, is a successful Defense Roll. The Regiment's armor or reflexes have saved them on this occasion! Any roll that is greater than both their Regiment's Defense and Evasion Characteristics, after any modifiers, is a failed Defense Roll and the Regiment suffers a Wound.
Note that you only make one roll, which is compared to both the Defense and Evasion Characteristics. Also note that the Defense Roll is an exception to the rule that any die roll of "1" is an automatic success. If your Regiment has a Defense and Evasion of 0 (or had these Characteristics reduced to 0 by a Special Rule), it cannot pass a Defense Roll.
Remove Casualties & Morale
Keep a tally of the Wounds each Stand in a Regiment has taken and proceed to the Removing Casualties step (see page 54).
Note that Wounds suffered from a Volley Action do not cause Morale Tests.
Pass
A Regiment or Character may opt to Pass instead of performing an Action. The Regiment or Character passes an Action without being treated as having performed an Action.
A Regiment or Character may opt to Pass any and all of its available Actions if it so wishes. If it chooses to Pass all of its Actions it will count as having Activated but not as having performed any Actions.
Last updated