Allocating Wounds & Removing Casualties
Chapter 5
On this page4
In this section you will find details of how Wounds are inflicted, allocated and resolved using the same system.
Allocating Wounds & Removing Casualties
Wounds are not assigned directly to a Regiment. Rather, each Wound suffered adds one Wound Marker to the Wound Pool. Once the size of the Wound Pool has been determined, begin to allocate the Wounds in the Wound Pool to Stands within the Regiment.
When allocating a Wound from the Wound Pool to the Regiment, start to allocate Wounds one by one to a Stand in the Regiment's rearmost rank, prioritizing Stands that have already suffered Wounds, and ignoring Characters, until the amount of Wounds suffered equals the Stand's Wounds Characteristic. Each Wound allocated to a Stand is represented by placing an appropriate Wound Marker next to it.
Once the Wounds allocated to a Stand equal its Wounds Characteristic, that Stand is destroyed and will be Removed as a Casualty. Stands that have suffered enough Wounds to be removed as casualties are removed from the battlefield the moment the last Wound is suffered. A Stand that has suffered Wounds but is still in play is referred to as a Wounded Stand.
Always allocate Wounds to Stands in the following order, ignoring Characters:
1. Wounded non-Command Stands must be allocated Wounds first.
2. A Stand must be destroyed before allocating Wounds to another Stand that has not suffered Wounds.
3. A Stand from alternating ends of a Regiment's rearmost rank, starting with the furthest stand from Command Stand, leaving the centermost Stand of a rank to suffer Wounds last.
4. A Stand that would cause the Regiment to reduce the number of Engaged Stands with an Enemy Regiment (make sure to leave as few unengaged Stands as possible!).
5. Command Stands are always removed last.
Wounds are nearly always allocated to a Regiment's rearmost rank. Should Stands be allocated Wounds suffered by an Enemy Regiment Engaged in melee, Wounds allocated should not cause the destruction of Stands that would affect the number of Stands in contact with any Enemy Regiment(s).
Effectively, this will mean you will remove Stands as Casualties from your rearmost rank, removing any that have suffered Wounds previously in the battle, while alternating removing from the left and right ends of the Regiment's ranks.
Finally, you should remove Stands that are not in contact with an Enemy Regiment unless there is no other option available.
Continue allocating Wounds one by one until there are no more Wound Markers in the Wound Pool, or there are no Stands left to allocate the Wounds to. Each time a Stand suffers Wounds, the Wound Pool and its subsequent allocation of Wounds starts anew.
It is important to keep in mind that the next step in the process after Removing Casualties, i.e. Testing Morale, requires the players to keep an accurate tally of the number of Wounds a Regiment has suffered from a single Wound Pool. Once a Regiment has been Allocated Wounds and proceeded to Remove Casualties, it then takes a number of Morale Tests equal to the Wounds it has suffered.
Therefore, it is important to take note of the amount of Wounds suffered from any single Wound Pool.
Example: A Stand of Men-at-Arms (Wounds 4) takes damage from an Enemy Regiment in contact. After all Defense Rolls are made, there are 2 Wound Markers in the Wound Pool. A Stand in the Regiment's rearmost rank is assigned the Wound Markers, one at a time, until there are 2 Wound Markers allocated on that Stand.
Example: A Stand of Men-at-Arms (Wounds 4) takes damage from an Engaged Enemy Regiment. After all Defense Rolls are made, there are 6 Wound Markers in the Wound Pool. The first available Stand of Men-at-Arms is allocated Wounds, one at a time, until 4 Wounds have been allocated.
Once 4 Wound Markers have been allocated, that Stand's Wounds Characteristic has been met and the Stand is immediately destroyed and Removed as a Casualty. The remaining 2 Wounds in the Wound Pool are then allocated to the next available Stand in the Regiment rendering it a Wounded Stand.
Below Starting Strength
If a Regiment has suffered any Wounds or lost Stands that have neither been Healed nor Restored (respectively) it counts as being Below Starting Strength and will be referred to as such by other rules.
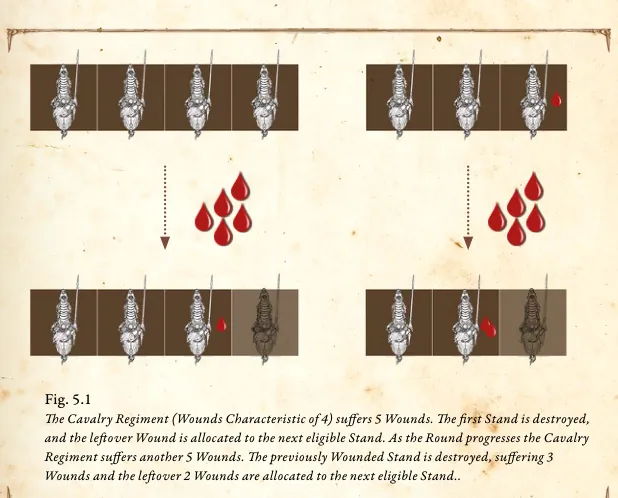
The Cavalry Regiment (Wounds Characteristic of 4) suffers 5 Wounds. The first Stand is destroyed, and the leftover Wound is allocated to the next eligible Stand. As the Round progresses the Cavalry Regiment suffers another 5 Wounds. The previously Wounded Stand is destroyed, suffering 3 Wounds and the leftover 2 Wounds are allocated to the next eligible Stand..
Healing
On occasion, a rule will call upon you to Heal a number of Wounds in one of your Regiments. When this happens, the rule will tell you the number of Wounds it Heals, which we refer to as Heal Points. If a rule calls upon you to Heal a Regiment, proceed in the following sequence, removing one Wound Marker per Heal Point until there are no more Wounds to Heal, or you have run out of Heal Points.
You cannot Heal a Regiment beyond the number of Stands it began the game with. In the case of multiple Healing abilities, resolve each one completely before moving to the next.
1) Heal Characters
Remove any Wound Markers from the Character if there are any present (see page 72 for more on Characters).
2) Heal Wounded Stands
Once all Wounds have been removed from any Characters, proceed to removing Wound Markers from the Regiment starting from the Regiment's Command Stand, if one is present. For each remaining Heal Point, remove one Wound Marker from a Wounded Stand in the Regiment until there are no more Stands in the Regiment that have suffered any Wounds.
3) Restore Stands
Once there are no Wounded Stands remaining, you may restore a Stand to play that was removed as a Casualty earlier in the Battle (note that you cannot restore a Character that has been removed as a Casualty). If the Regiment's Command Stand, or Stands containing Command Models, have been removed as casualties earlier in the game, then those must be restored first. If the number of remaining Heal Points is at least half the unmodified Wounds Characteristic value of that Stand (rounding up), then you may spend that many Heal Points to return it to play with a number of Wounds remaining equal to the amount of Heal Points that were used to Restore it.
The Stand is returned to play in such a way that the Regiment maintains a legal formation. If there is no room to place the Stand, the Stand is not placed and all remaining Heal Points are lost. Return the Stand to the battlefield and place an appropriate number of Wound Markers beside the Stand so that the newly restored Stand has half its remaining Wounds (rounding up). Should the newly restored Stand be the Regiment's Command Stand or a Stand containing a Command Model, then any associated abilities or Special Rules are restored as well.
Next, return to the "Heal Wounded Stands" step and use the remaining available Heal Points if any.
Continue to repeat these steps until you no longer have any Wound Markers to remove or any more destroyed Stands to return to the battlefield.
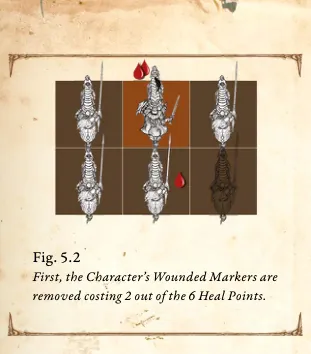
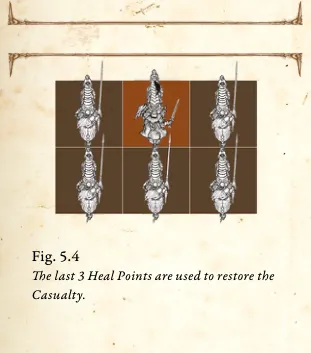
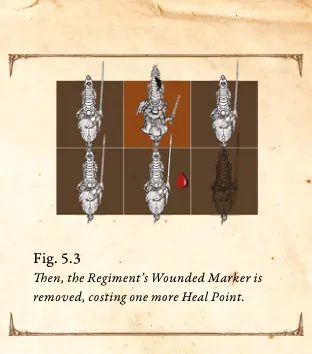
As a complete example, the Household Knight Regiment in Figures 5.2 through 5.5 have 6 Wounds to Heal in total. The [Character] has 2 Wound Markers, suffered as a result of a Duel, while the Regiment itself has a Stand with 1 Wound Marker. Finally the Regiment sustained a casualty earlier in the game losing one of its Stands.
Testing Morale
Once the Wound Pool is empty, it is time to see if the onslaught of blood and death has shaken the resolve of the troops – proceed to Testing Morale in Chapter 6!
First, the Character's Wounded Markers are removed costing 2 out of the 6 Heal Points.
The last 3 Heal Points are used to restore the Casualty.
Then, the Regiment's Wounded Marker is removed, costing one more Heal Point.
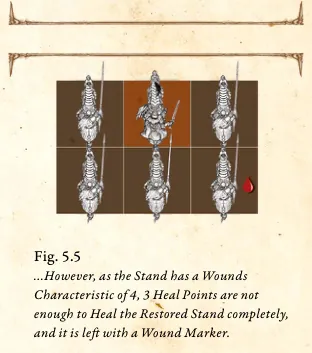
...However, as the Stand has a Wounds Characteristic of 4, 3 Heal Points are not enough to Heal the Restored Stand completely, and it is left with a Wound Marker.
Last updated