Testing Morale
Chapter 6
On this page6
In this section you will find details of how a Regiment tests Morale after having suffered Casualties as the result of an Action.
A Regiment tests Morale after Wounds are suffered as the result of an Action. Morale is tested against a Regiment's Resolve.
Calculating a Regiment's Resolve
If there is more than one Resolve Characteristic in the Regiment, use the highest, then add the following bonuses:
+1 if the Regiment consists of 4-6 Stands, +2 if the Regiment consists of 7-9 Stands, +3 if the Regiment consists of 10 or more Stands.
These bonuses are not cumulative – i.e. you always use the highest.
Testing Morale
A Regiment tests Morale after Wounds are suffered as the result of an Action, Special Rule or other abilities. Morale is tested against a Regiment's Resolve. Once a Regiment has been allocated all Wounds from a single Wound Pool and removed any Casualties, roll a number of dice equal to the number of Wounds suffered by the Regiment. This is referred to as Testing Morale.
The Morale Test
Each result that is less than or equal to the Regiment's highest Resolve Characteristic, after any modifiers, is a success. Each result that is greater than the Regiment's highest Resolve Characteristic, after any modifiers, is a fail.
For each failed Morale Test, the Regiment suffers 1 Wound – it is important to note that these Wounds do not trigger further Morale Tests. These Wounds are allocated as described in the Allocating Wounds and Removing Casualties on page 54.
: Your Regiment of Militia (Resolve 2) suffers 5 Wounds from a single Action. You roll 5 dice, scoring 1, 2, 3, 3, 6. This means two tests are passed and three are failed. 3 Wounds are allocated to a Stand in the Regiment.
: Your Regiment of Order of the Crimson Tower (Resolve 4) suffers 3 Wounds. You roll 3 dice, scoring 1, 3, 6. Two pass, and one fails. Another Wound is allocated to a Stand in the Regiment.
Broken Regiments
If, during the course of a single Round, a Regiment loses half or more of the Stands than it had at the beginning of the Round or when it last Rallied during that Round (rounded up), it is immediately Broken.
Interrupt the regular play sequence, place a Broken Marker beside it as a reminder, and then resume play. A Broken Regiment ceases to be Broken if it successfully performs a Rally or Combat Rally Action, or if a Special Rule or ability removes the Broken status.
Effects of Being Broken
Broken Regiments:
- The Regiment uses the lowest Resolve Characteristic in the Regiment. Furthermore, it may not be affected by rules and abilities that occur during the game and positively affect its Resolve Characteristic.
- Should a rule positively affect a Regiment's Resolve Characteristic as well as provide other effects only the Resolve affecting part of the effect is ignored.
- Are unable to perform a Charge Action during their Activation
- Cannot be Healed or have Stands Restored
- Their Stands do not count toward Seizing Objective Zones
- Cannot benefit from the Special Rule.
Additionally, [Character]s in a Broken Regiment:
- May not refuse a Duel Action
- May, as an Action, remove the Broken status from the Regiment they are attached to. This follows the rules of Rally or Combat Rally Actions (as appropriate) as if the Regiment had performed the Action.
Shattered Regiments
If a Broken Regiment loses half or more of its remaining Stands over the course of a Round (counted from the moment it was Broken, not the start of the Round), it is immediately Shattered. Its warriors throw down their arms and run for safety. Remove all Stands of the Shattered Regiment from the Battlefield as casualties, and the Regiment is destroyed. A Regiment may be Broken and Shattered as the result of a single Action or Special Rule.
Stranded Regiments
As a Regiment suffers Casualties and Stands are removed, its melee opponents may find that they are no longer in contact – we refer to these as Stranded Regiments. As Casualties are removed from the rearmost rank, this commonly happens when a Regiment is fighting to its rear.
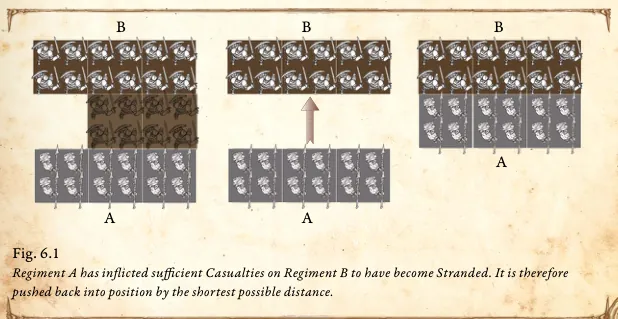
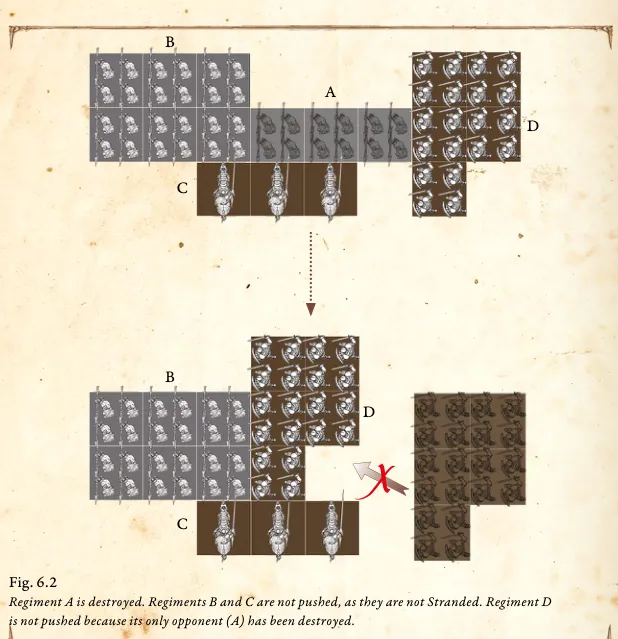
Note that only Regiments no longer in contact with an Engaged Enemy Regiment count as Stranded. If, for example, a Regiment was in contact with two enemy Regiments at the start of the Action, it only counts as Stranded if it is no longer in contact with either. For all intents and purposes If you would lose contact with an Enemy Regiment after a Clash, Charge or Volley Action remaining in Legal formation takes priority over keeping contact.
Press the Attack
Once all Casualties have been removed (including any from failed Morale Tests) and two or more Regiments are no longer in contact, the Active Player must "Press the Attack". The Active Player "pushes" the Stranded Regiment back into contact with the Enemy Regiment it was previously in contact with, by the shortest possible distance as described in Fig 6.1. They then choose another Stranded Regiment, and push that back into contact, and so on, until all their Stranded Regiments are back in contact.
Pushing Regiments
When you "push" a Regiment, you must aim to place the same number of Stands in contact (from both sides) as was the case before any Casualties were removed. If this is not possible, maximize the number of Stands in contact from both sides.
You may not "Press the Attack" to bring your Regiment into contact with an Enemy Regiment it was not previously Engaged with before Casualties were removed.
If a push cannot be completed for any reason, then the Regiment returns to its previous position, before attempting the push, and remains Stranded. If, after "Pressing the Attack", there are any Stranded Regiments remaining, those Regiments are now considered Unengaged.
Regiment A has inflicted sufficient Casualties on Regiment B to have become Stranded. It is therefore pushed back into position by the shortest possible distance.
Press the Attack, Impact Attacks and March Special Rules.
"Press the Attack" pushes do not inflict Attacks. Nor do they benefit from any Special Rules triggered by March Actions, such as .
Regiment A is destroyed. Regiments B and C are not pushed, as they are not Stranded. Regiment D is not pushed because its only opponent (A) has been destroyed.
Last updated